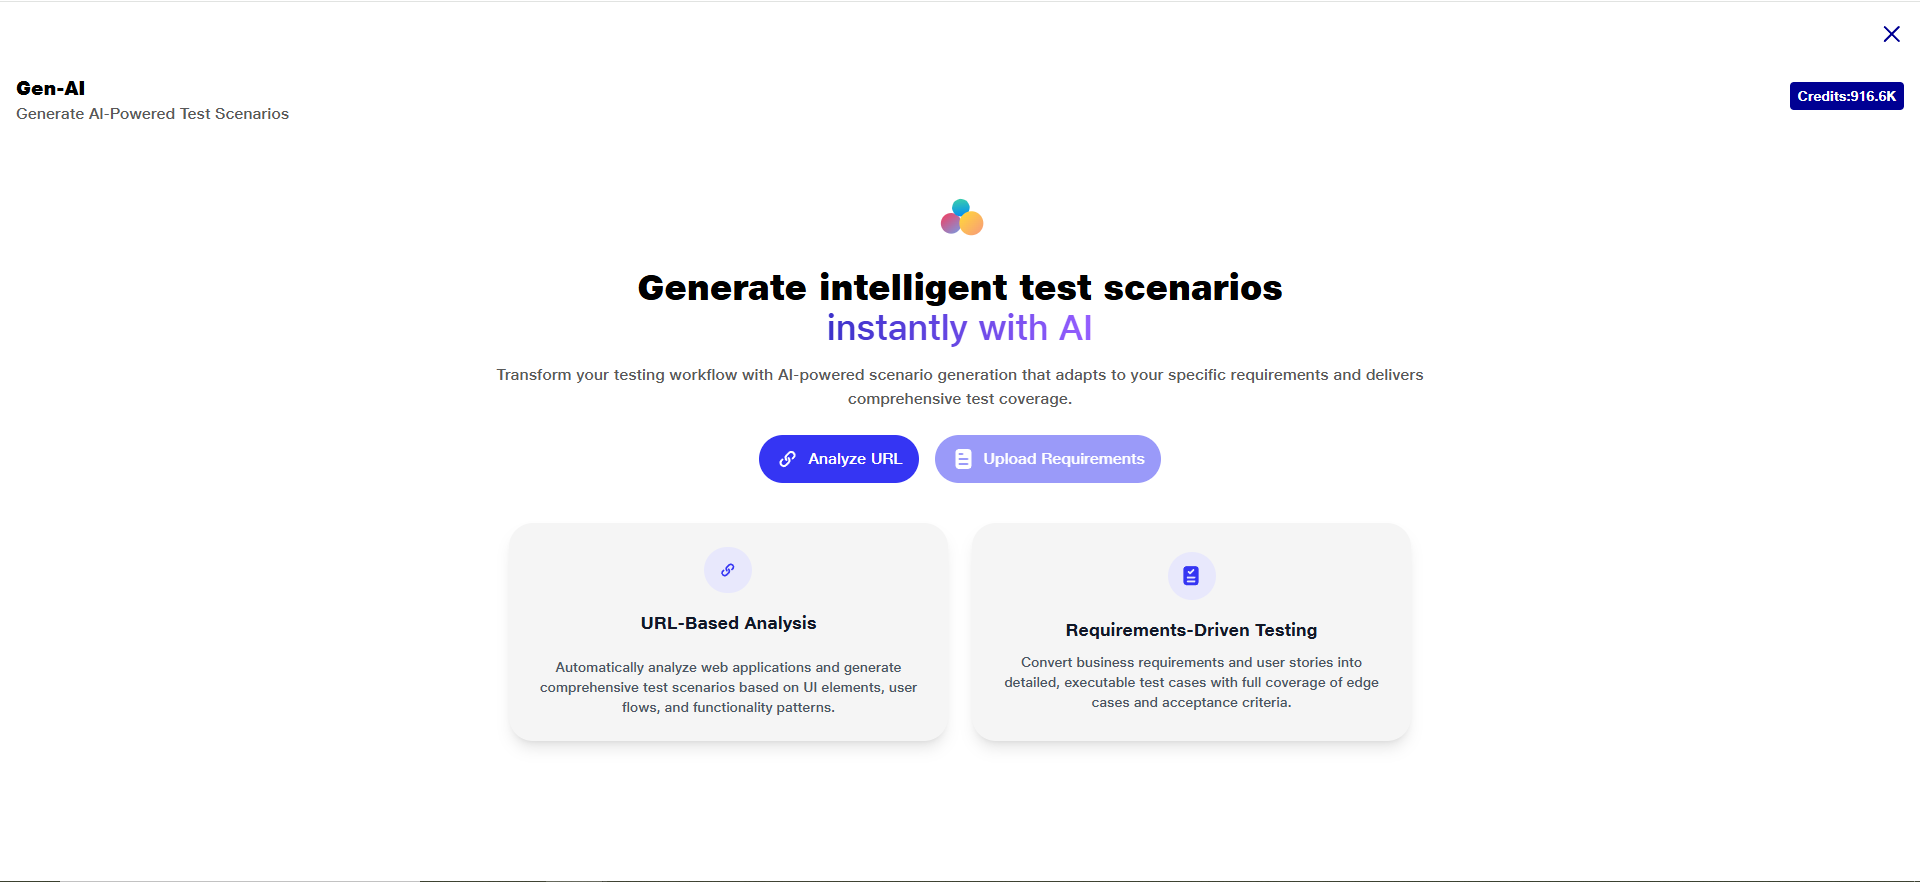
AI-Generated Test Steps
AI Step Generation with Live Preview enables users to automatically generate automation test cases by providing a product URL and a description. Leveraging AI, Automator.AI analyzes the input to generate relevant test steps and presents them as either a single flow or AI-suggested variations. With real-time visual feedback and the ability to refine outputs instantly, this feature enhances accuracy, interactivity, and streamlines the overall test creation experience.
1) Location of AI-Generated Test Steps
a. Navigate to the Gen-AI button on your scenario list.
 b.The following page will open to guide you through the AI-powered generation of test steps based on your input.
2) AITest Step Generation Methods
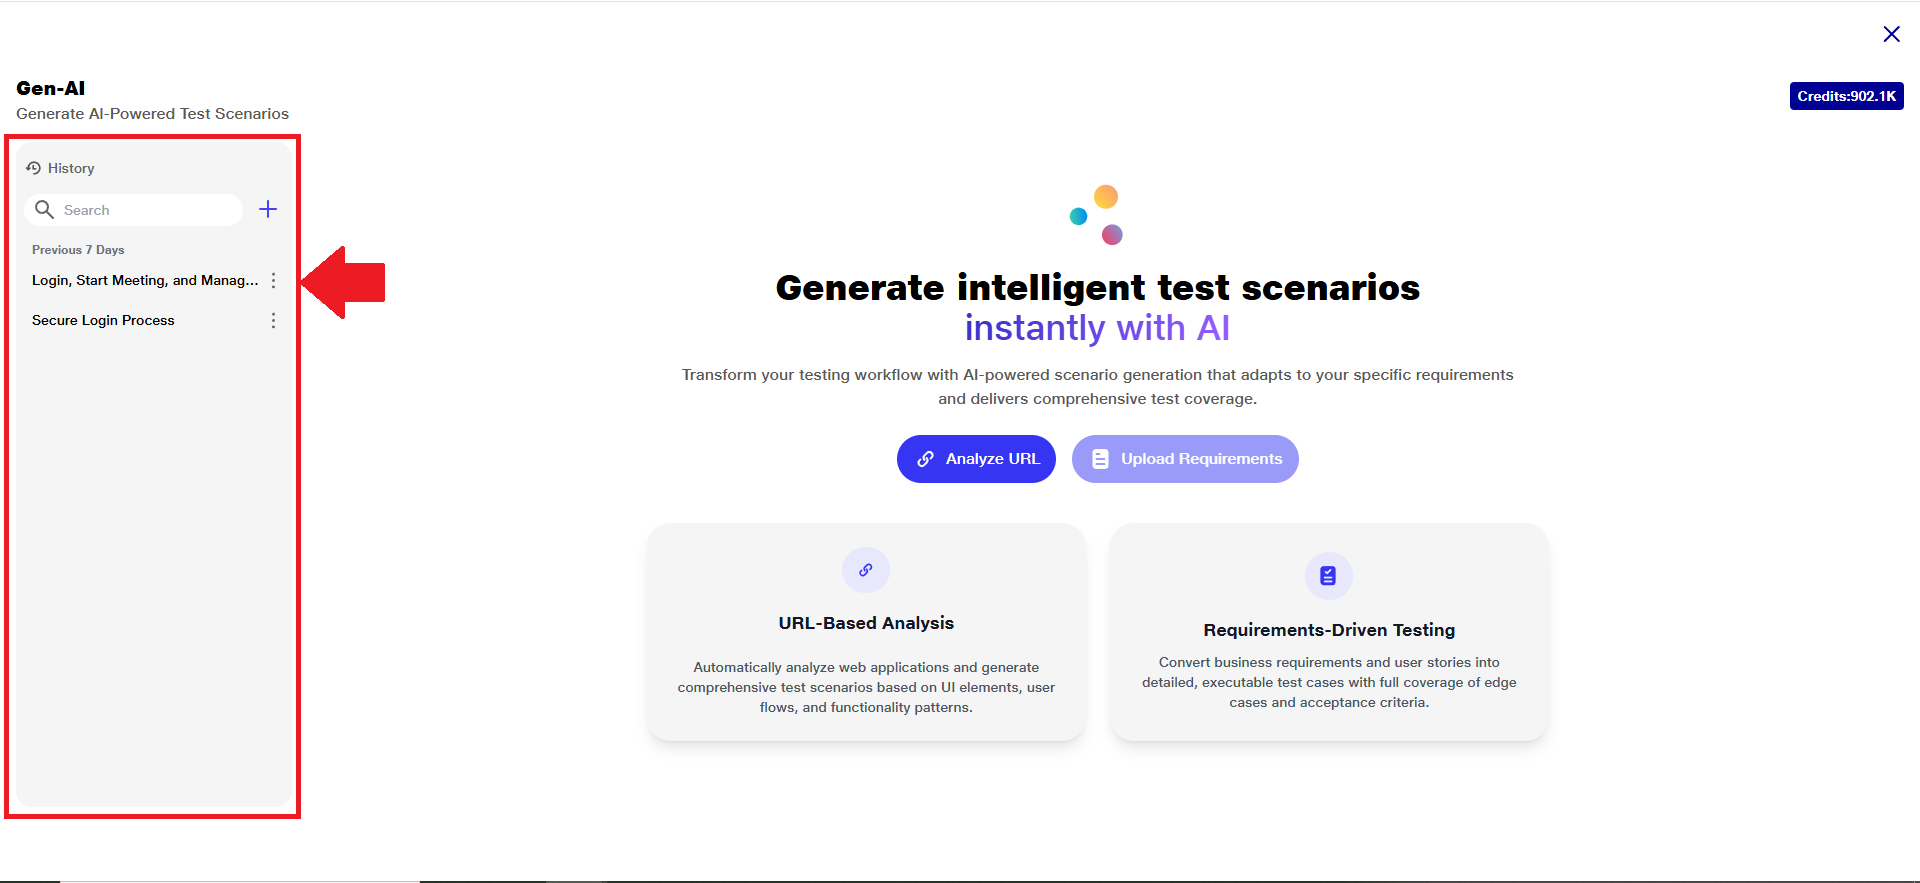
a. You can streamline your testing process by generating scenarios/ steps from what you already have — URL or docs. Kindly review the following two options to get started:
i) Analyze URL (URL Based Analysis): Automatically analyze web applications to generate comprehensive, executable test scenarios based on UI elements, user flows, and functionality patterns. The AI ensures end-to-end coverage by detecting visual components, interaction paths, and behavioral logic tailored to your application's structure.
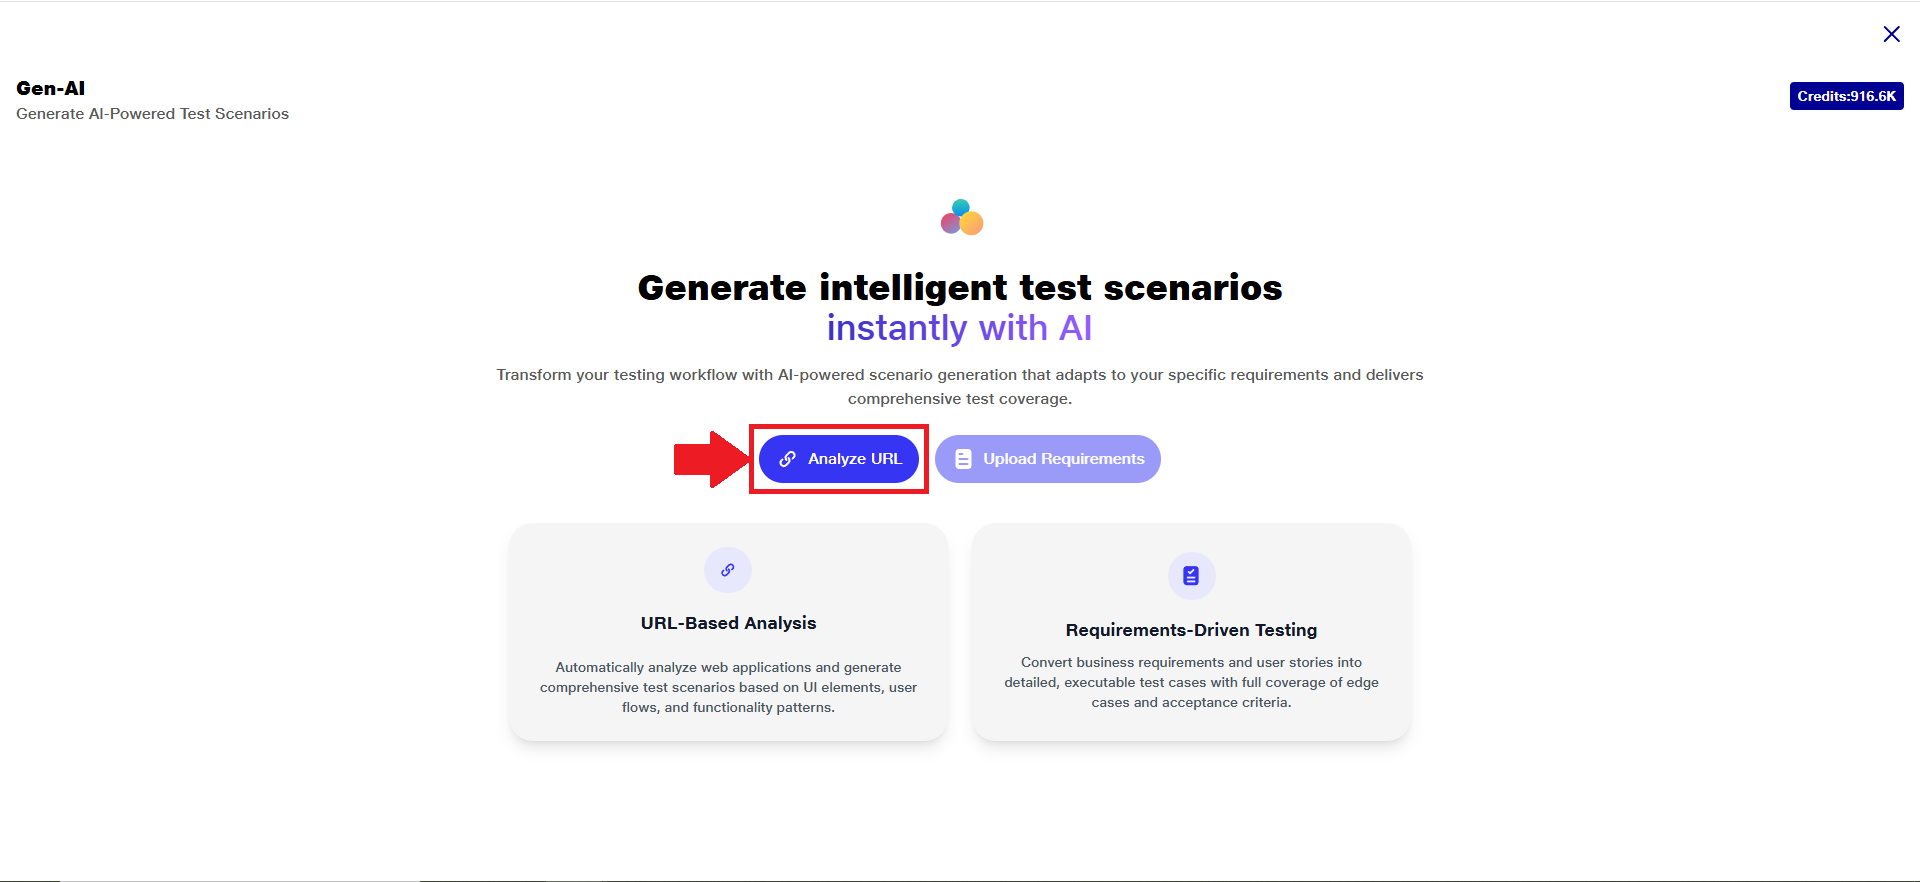
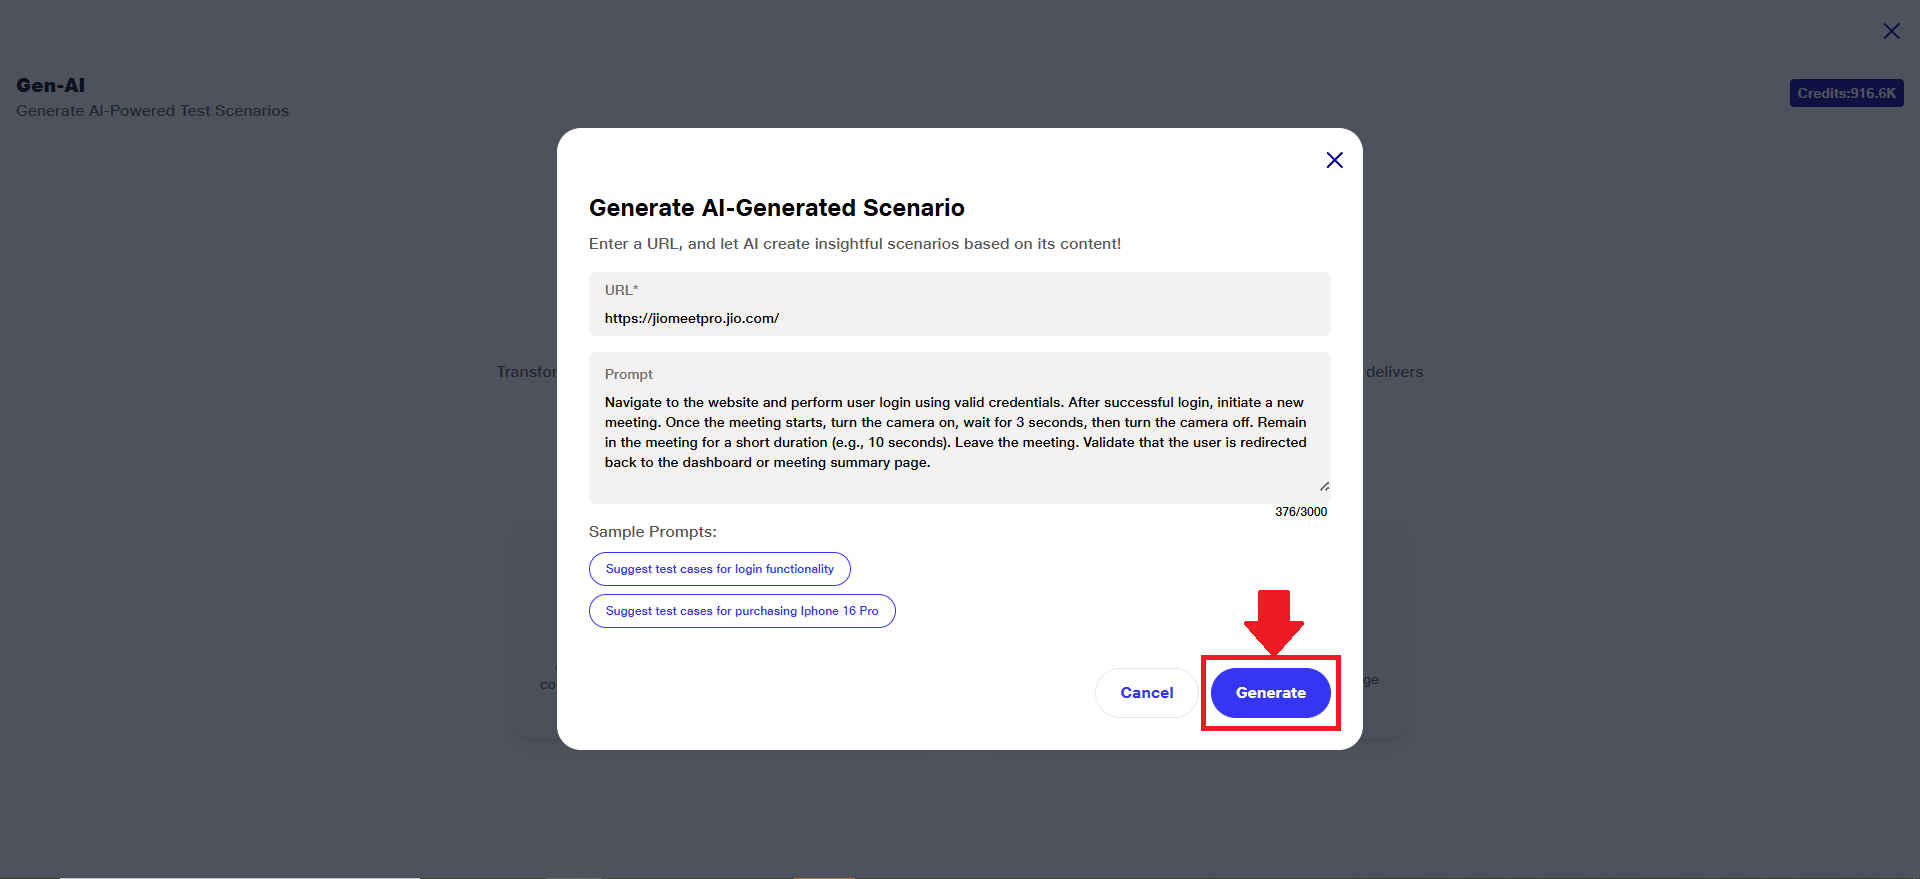
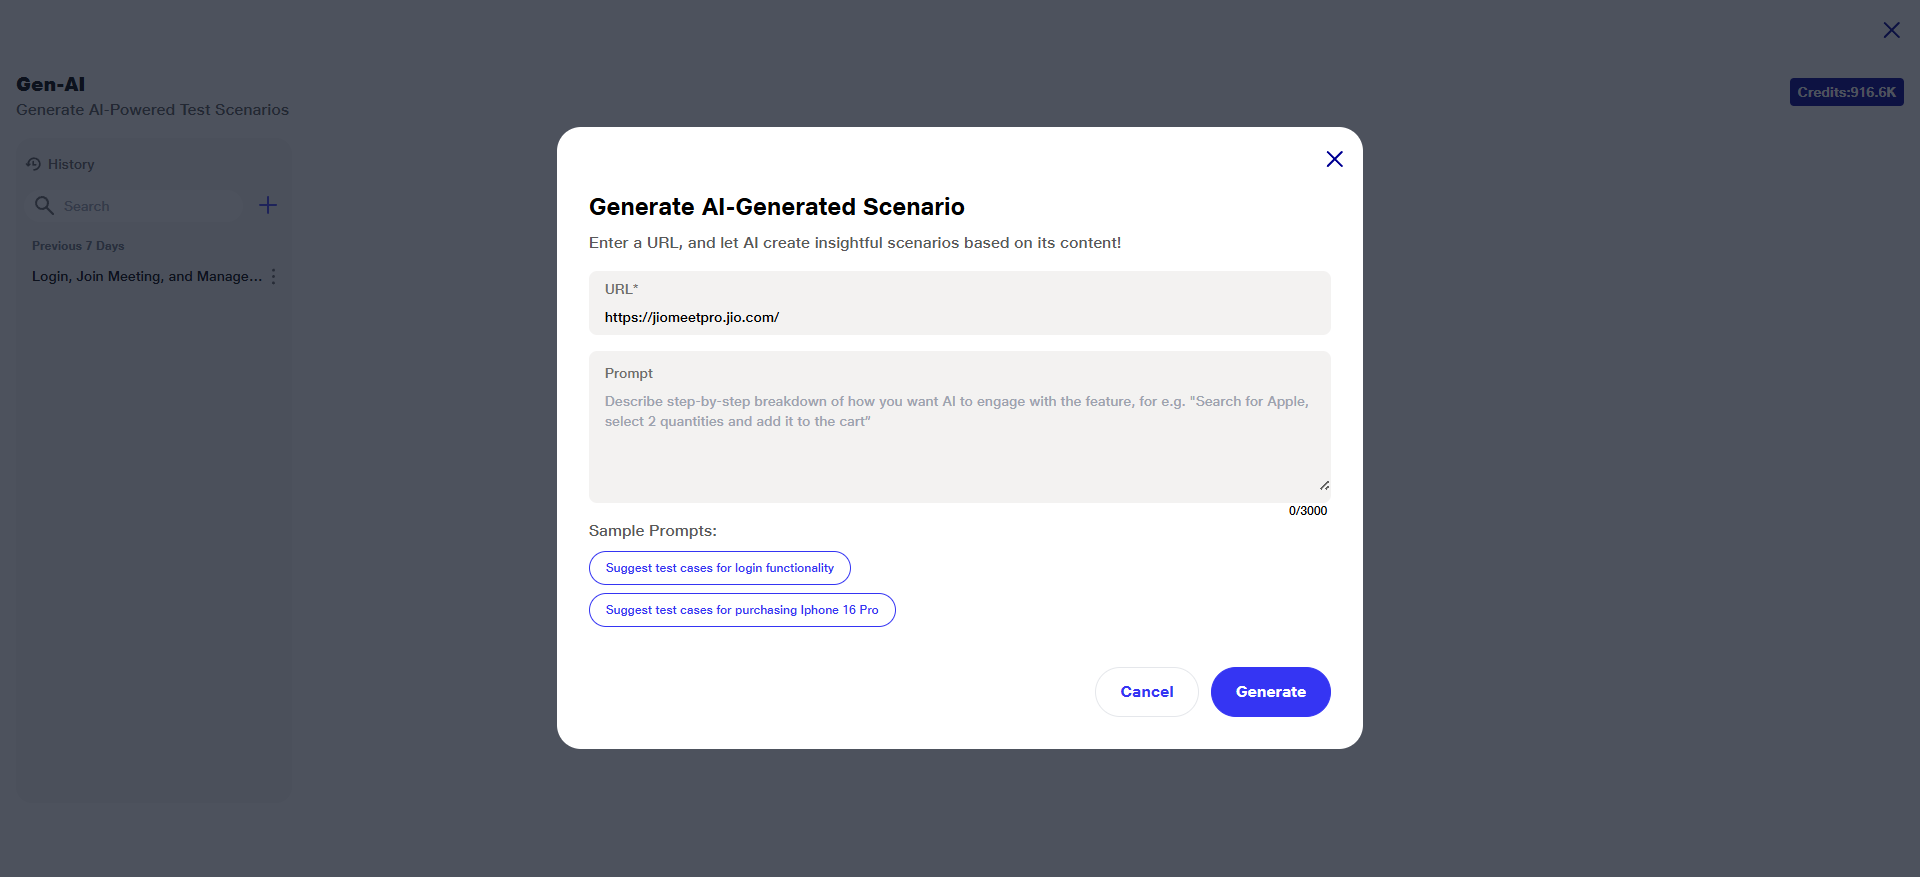
3) Steps to Execute Analyze URL
a) To get started with URL-based AI test step generation, click on 'Analyze URL’.
 b) The page contains two main fields: 'URL' and 'Prompt'. Additionally, a 'Sample Prompts' section is provided to help users quickly select predefined prompts, saving time and reducing the need for manual typing.
 c) Enter the URL that needs to be analyzed.
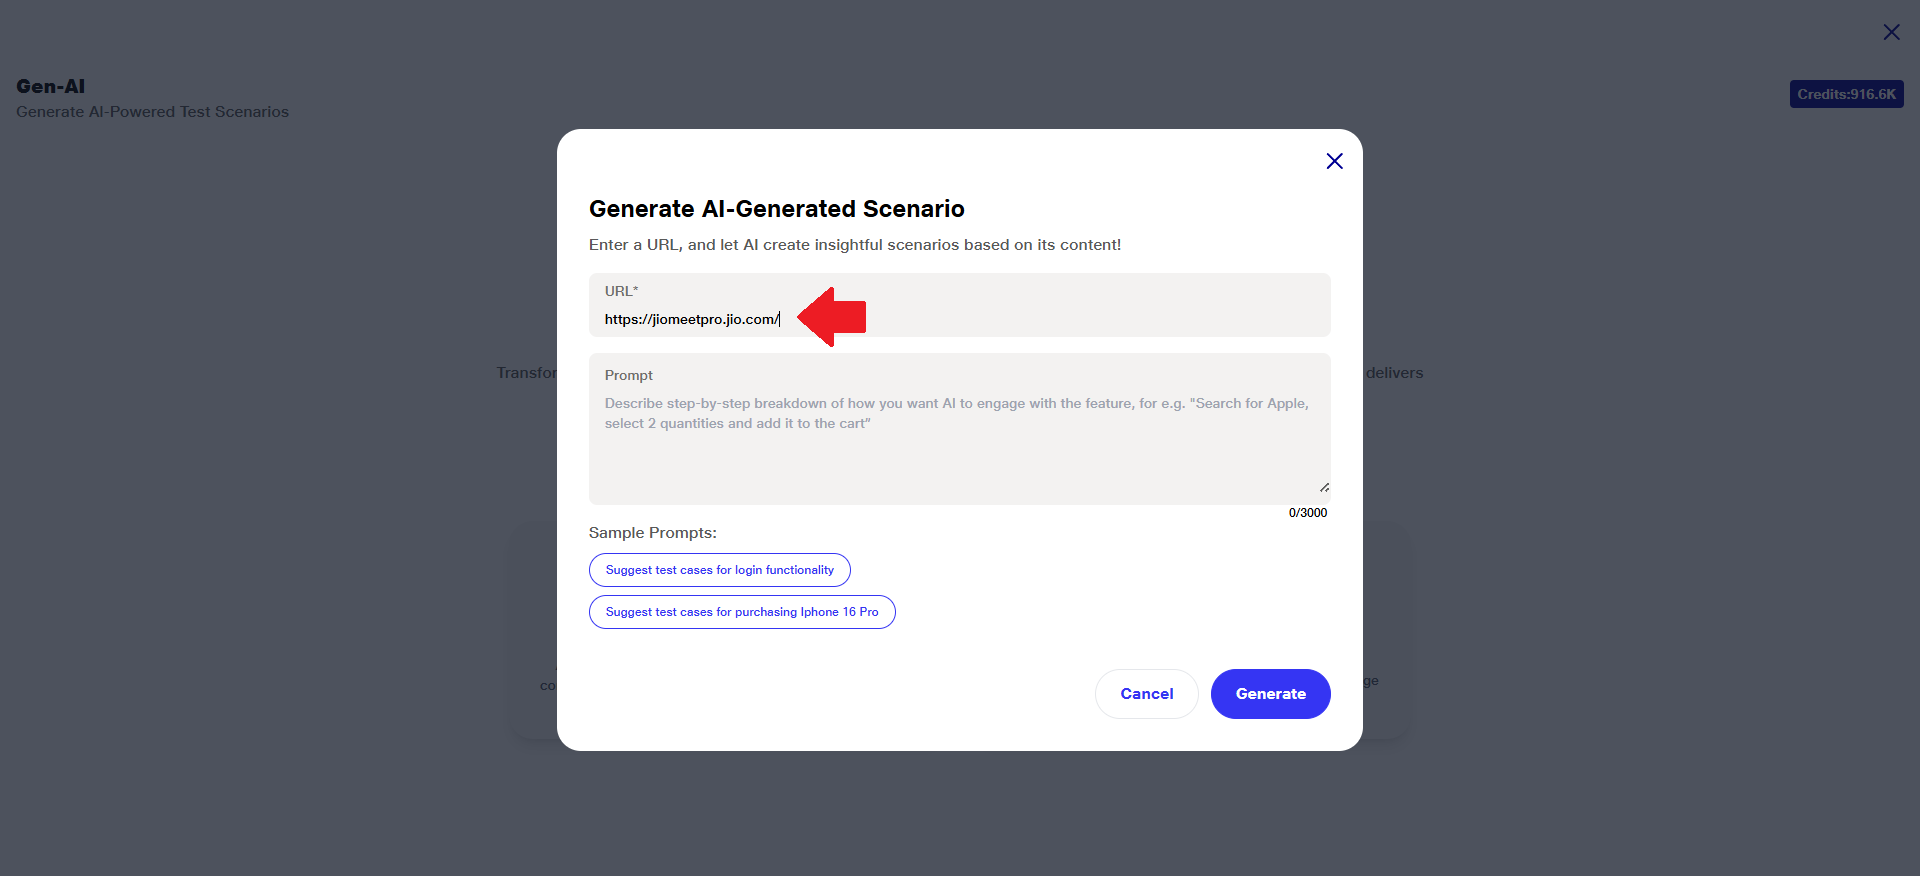 Note: The URL field is mandatory. The Generate button will become active only after a valid URL is entered.
d) Enter the prompt describing the test scenario or action you want the AI to perform based on the analyzed web page.
e) The prompt description limit is up to 3000 characters.
 f) Alternatively, you can select a predefined option from the 'Sample Prompts' section to quickly populate the prompt field without manual typing. This helps streamline the process and ensures properly structured inputs.
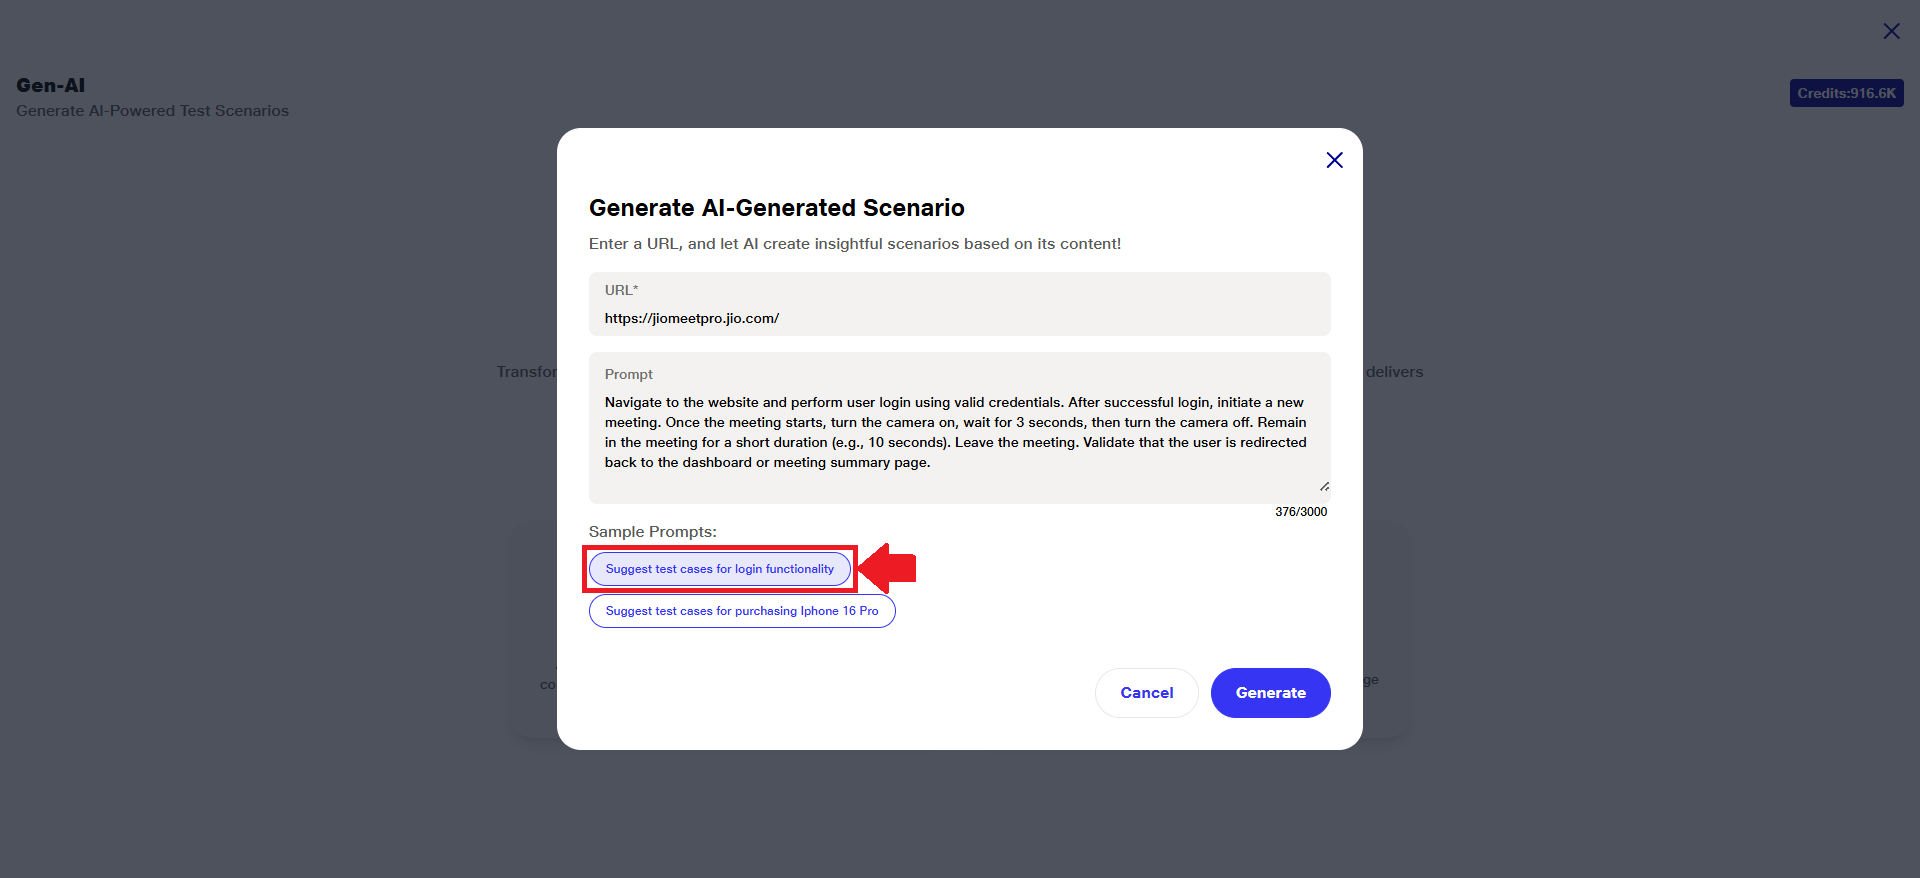 g) Once the URL and Prompt fields are filled, click on the 'Generate' button to proceed with AI-based test step generation.
 h)Important: The URL must be whitelisted before the AI can proceed. If the URL is not on the whitelist, you will see the following error message: The provided URL is not whitelisted. Please add the URL to the whitelist and try again.
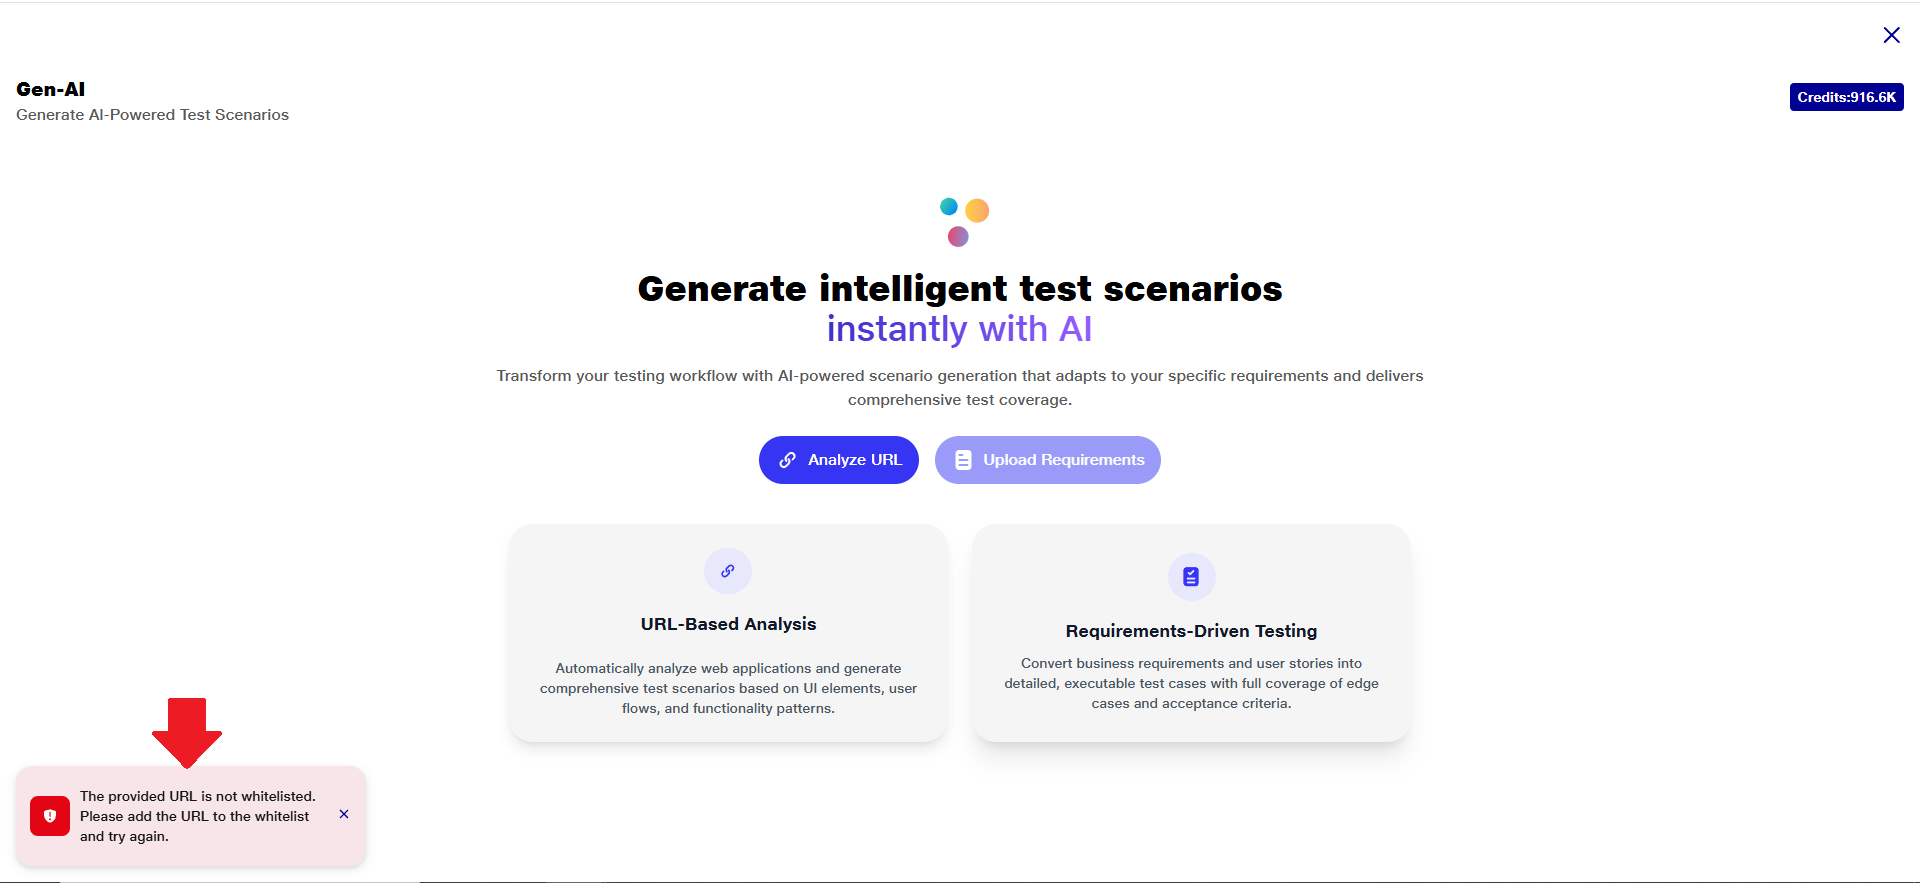 Please ensure that the URL is added to the whitelist to continue with test step generation.
i) The process of generating test cases for the provided URL will begin.
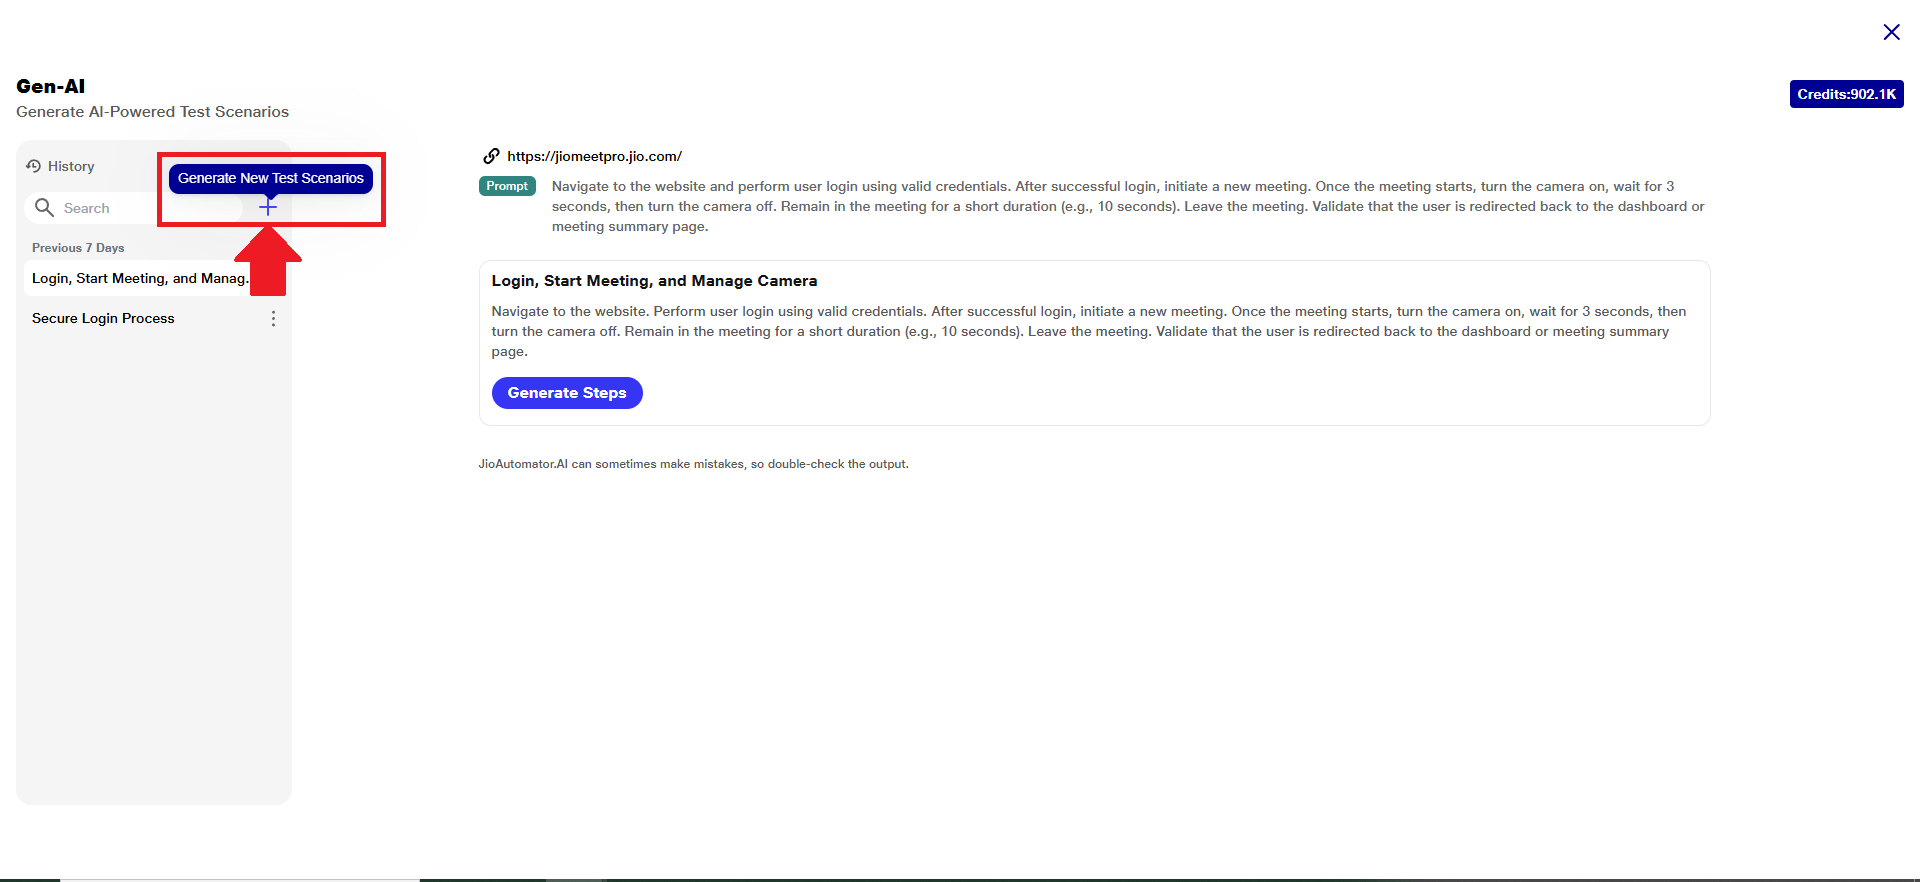
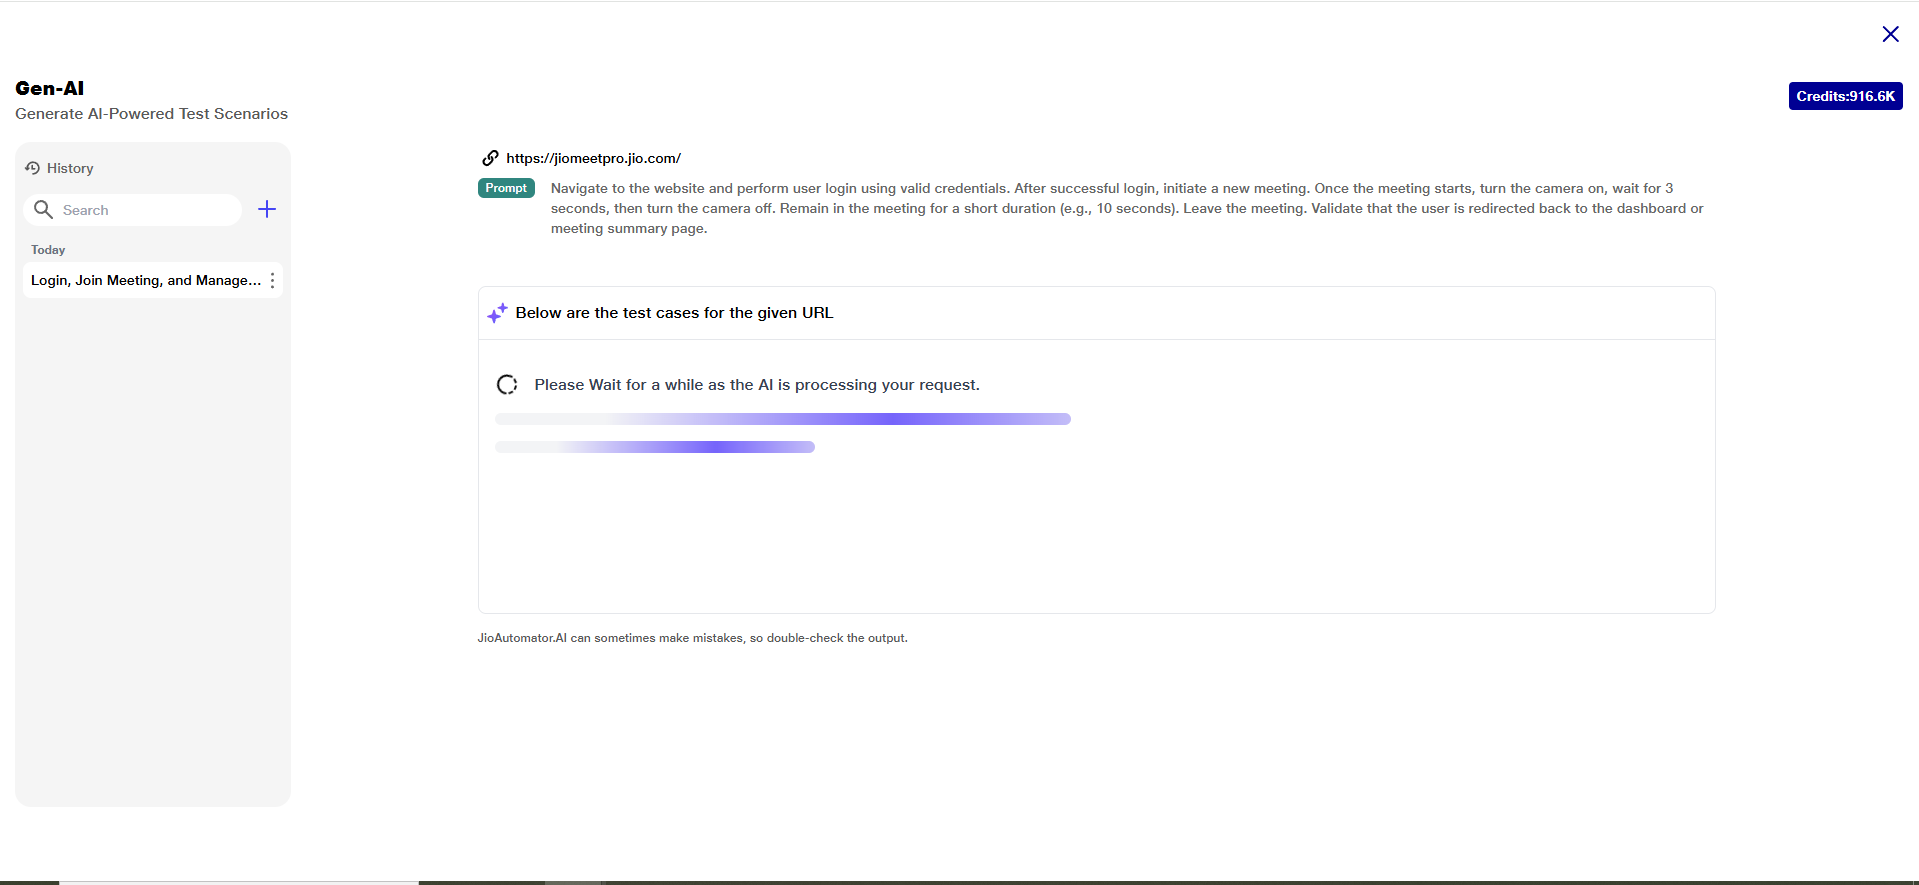 j) Using the provided prompt, the AI will generate and suggest a single comprehensive test case aligned with your testing requirements.
 k) If the user provides only a URL without specifying any additional prompts or requirements, the system will automatically generate a list of multiple relevant test scenarios based on the URL content.
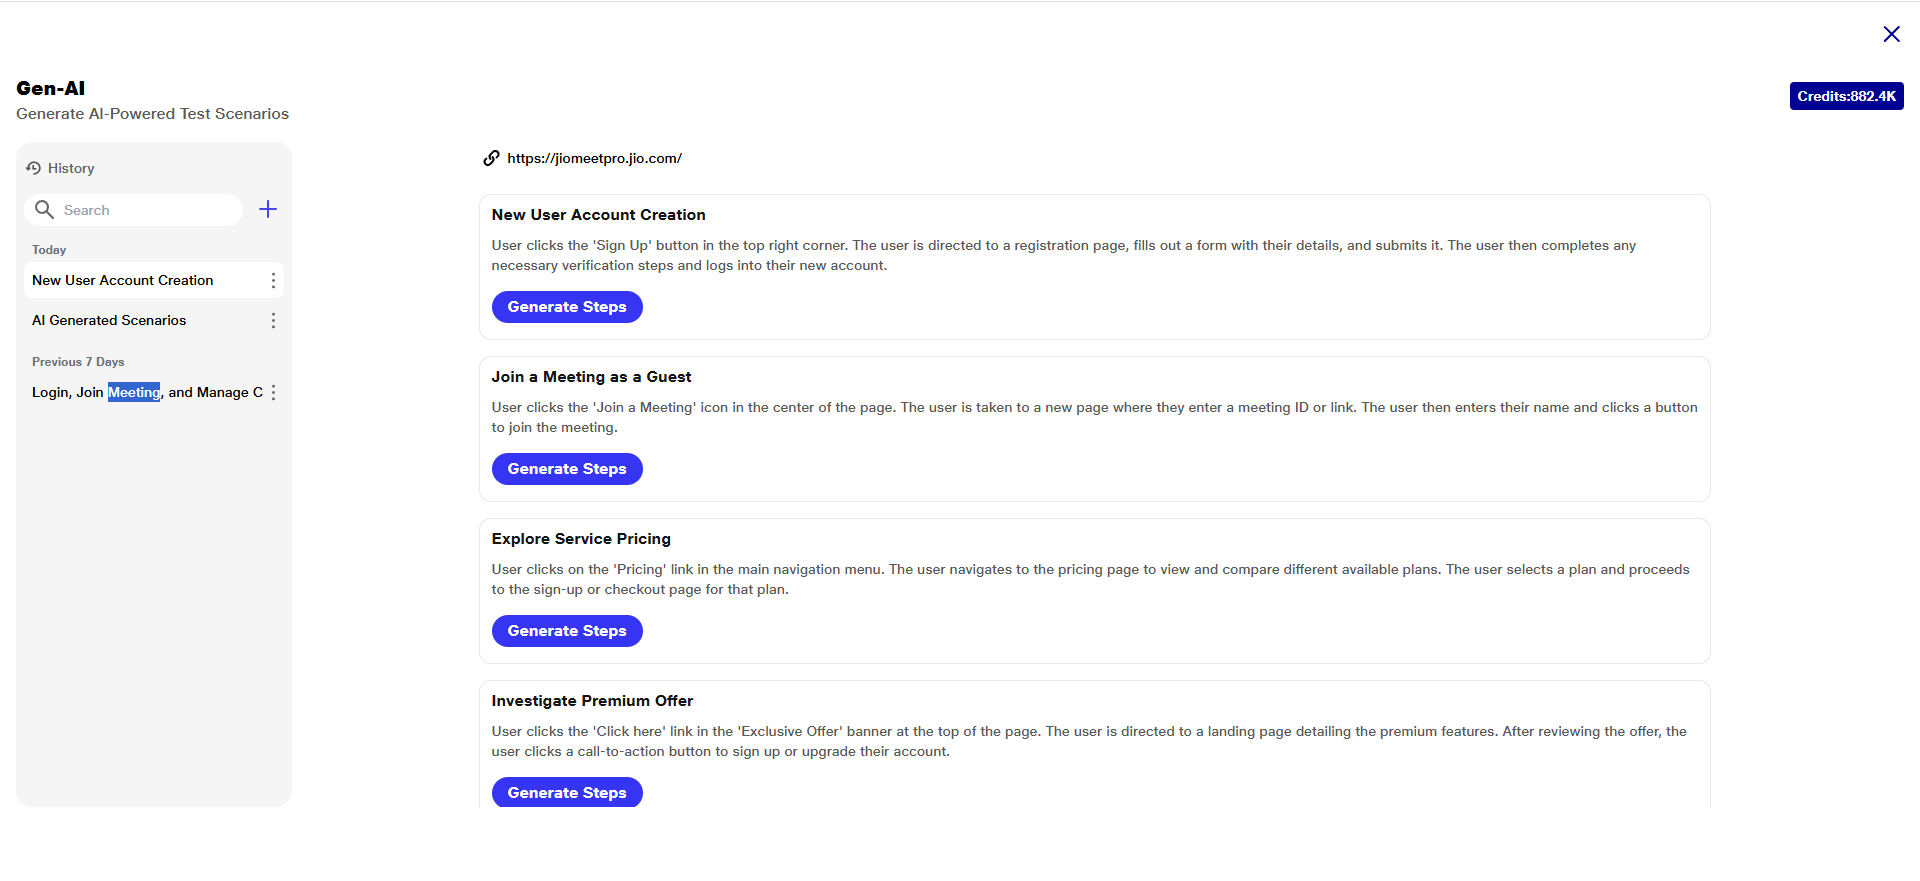 l) Each test scenario in the list includes a brief description and is accompanied by its own ‘Generate’ button. This allows users to quickly explore different testing approaches relevant to the given URL without needing to input detailed information.
m) Users can review these scenarios and choose to generate the test steps for any scenario by clicking the respective ‘Generate’ button.
n) Once your preferred format is ready, click on the ‘Generate Steps’ button corresponding to your chosen scenario to initiate the creation of the test steps.
 o) In the 'Generate Test Steps' section, the 'URL' field is mandatory. The fields 'User Type', 'Sign-Up Required', and 'Additional Information' are optional and can be filled in to provide more context for better test step generation.
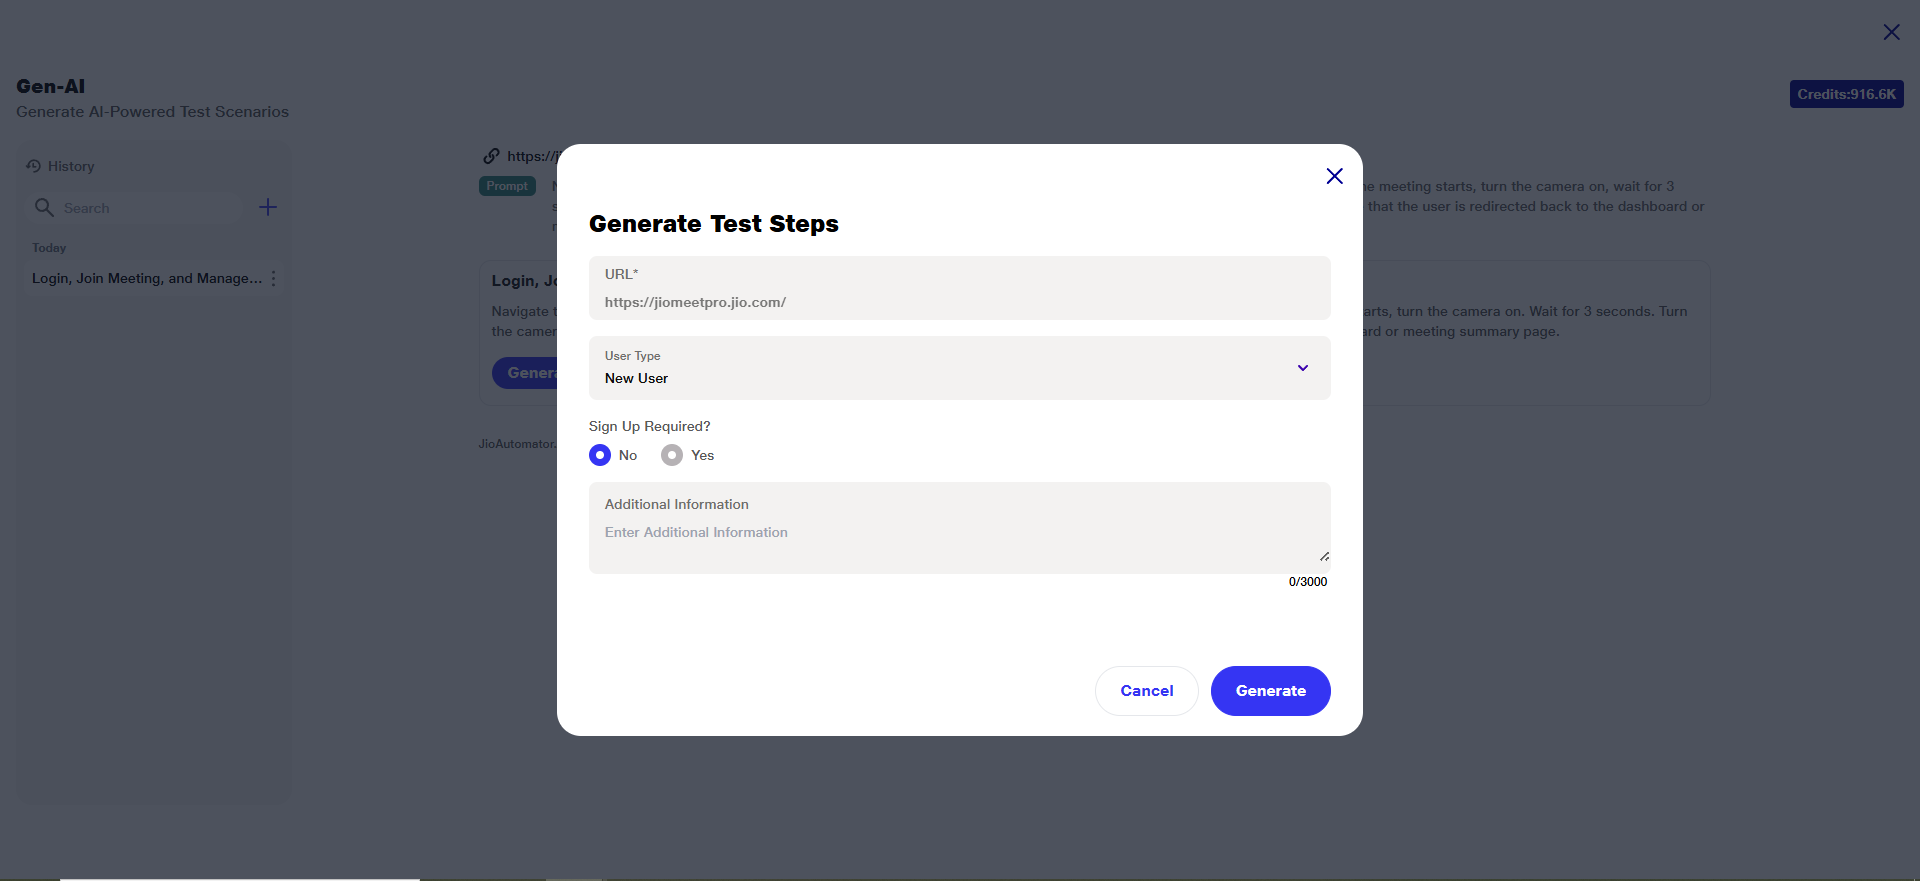 p) The 'URL' field is auto filled from the previously provided link and cannot be edited manually.
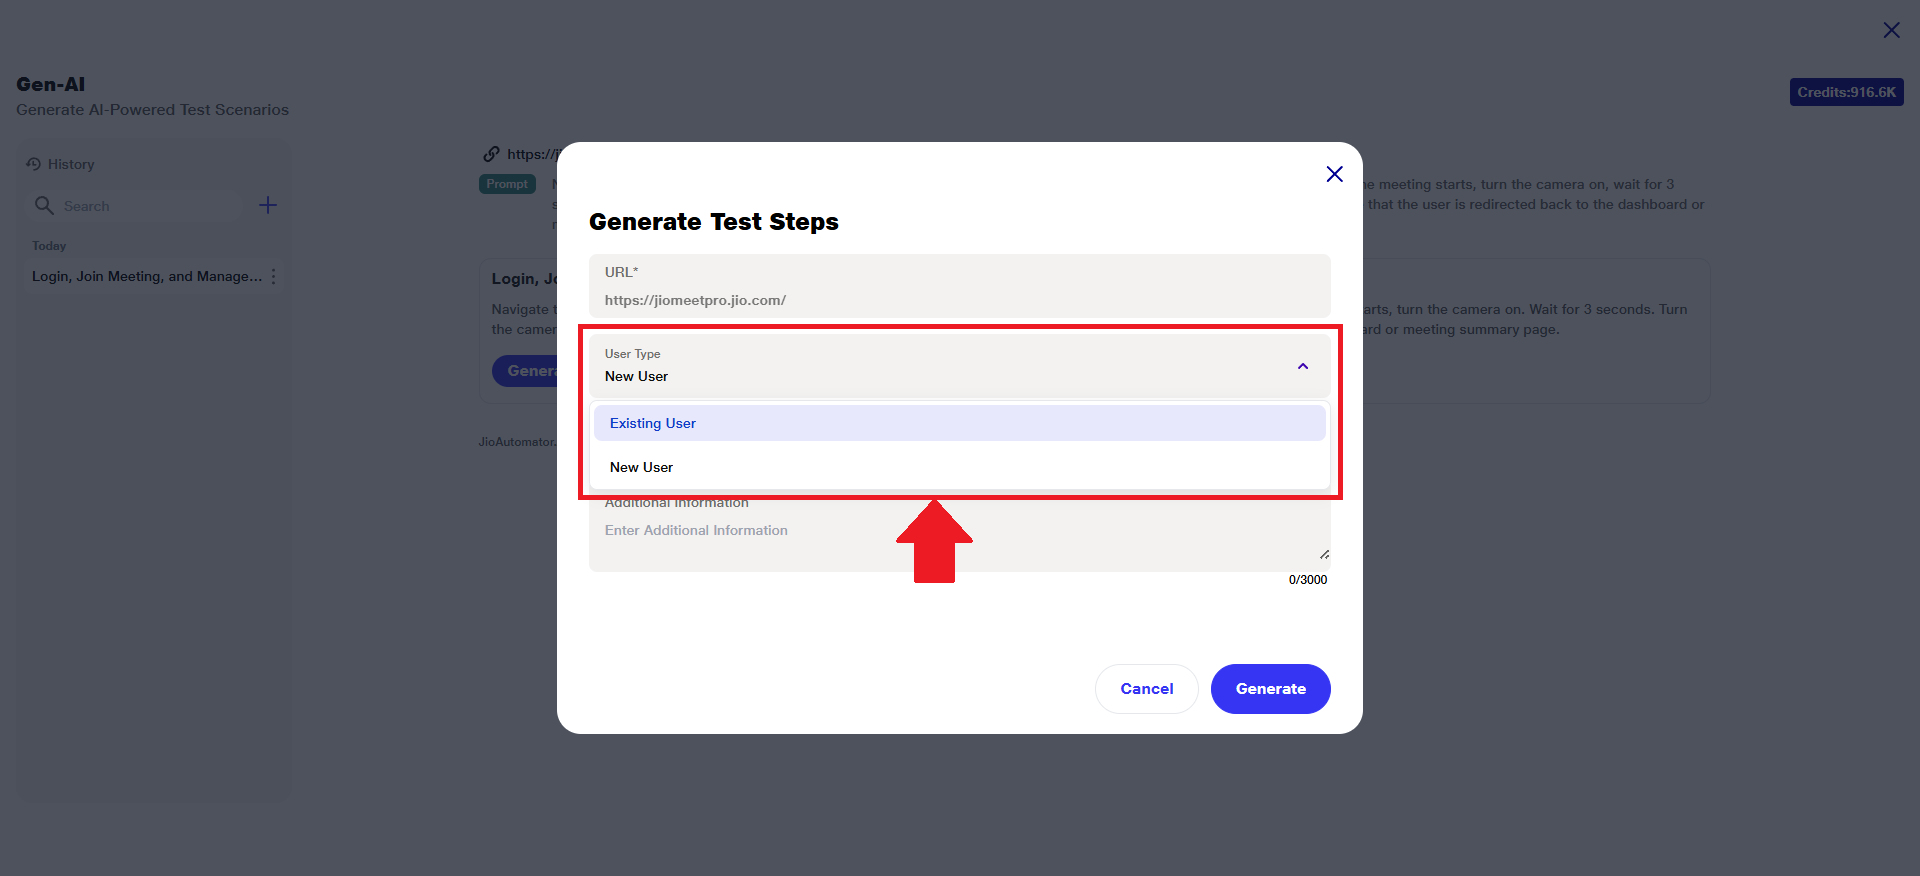
q) There are two options under 'User Type':
i) Existing User
Ii) New User
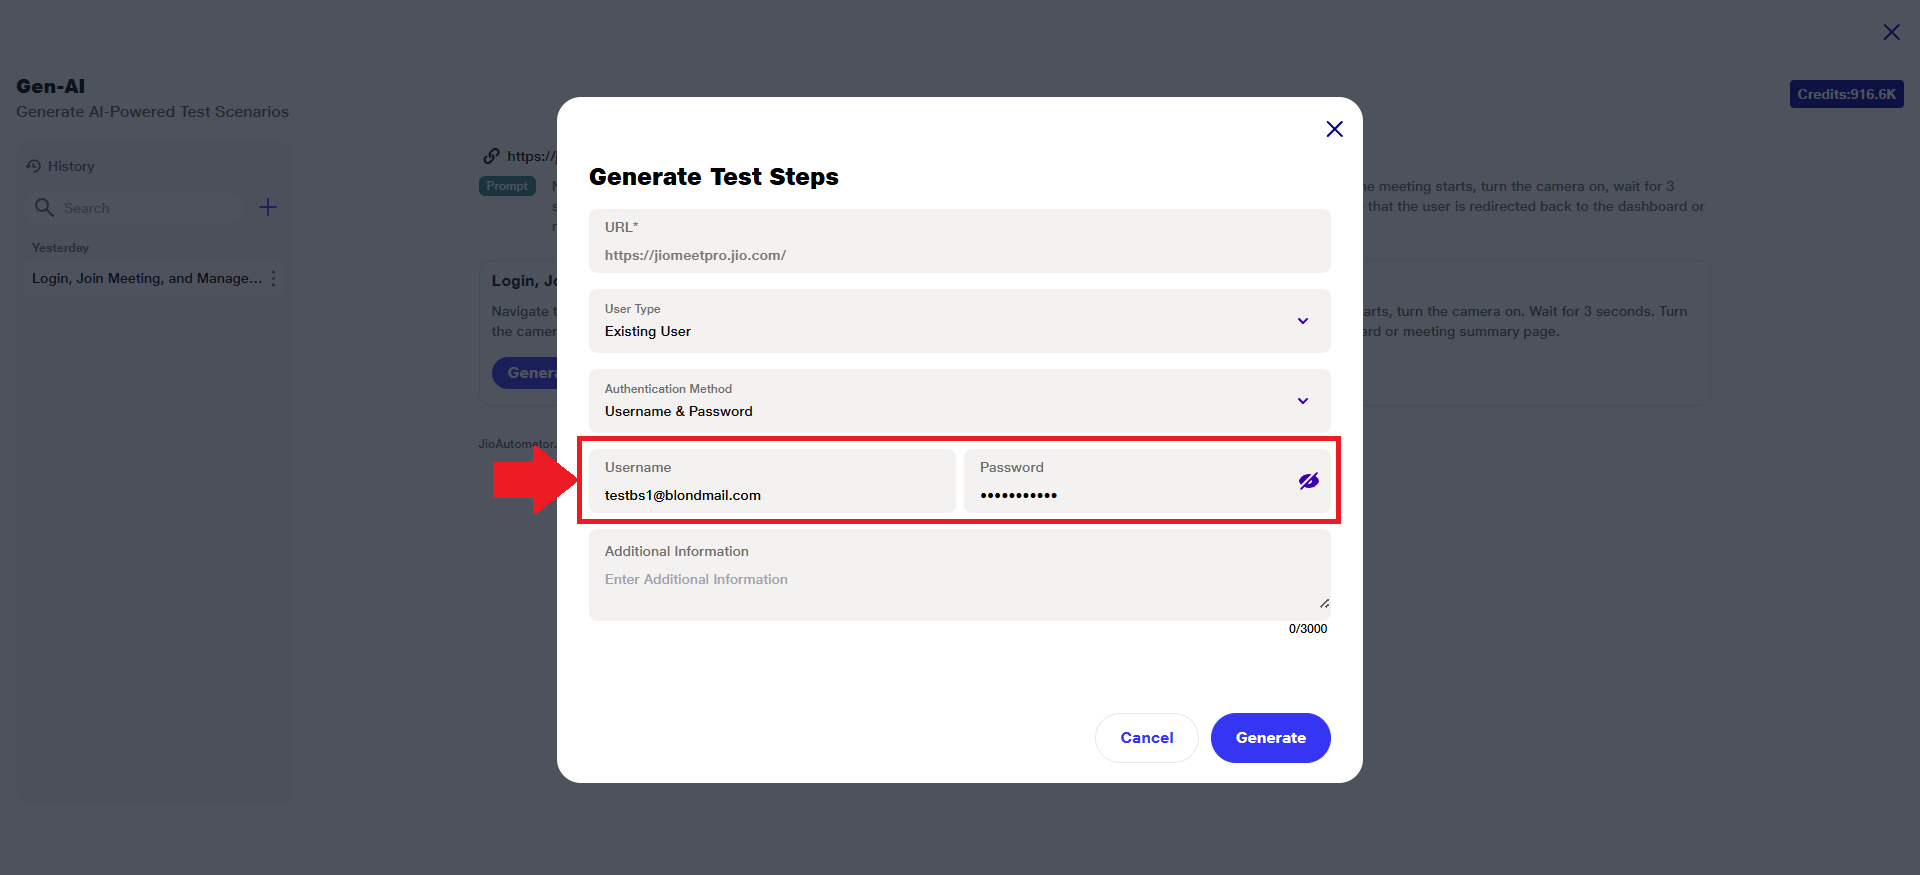
A) Existing User Authentication
1) For users classified as 'Existing User', the 'Authentication Method' must be specified.
2)By default, 'Username & Password' is preselected as the authentication method. However, if preferred, you can choose the alternative option — 'Mobile Number & OTP' — from the available selection.
 3)Ensure that the appropriate authentication method is selected based on your login requirements.
4)For ‘Username & Password’, the respective username and password must be provided in the designated fields.
5)If previously signed as a new user and created an account, then the user can copy Email & Password from the test steps and paste it over here.
 6)If 'Mobile Number & OTP' is selected as the authentication method, an additional field — 'OTP Method' — will appear. This allows you to choose how the OTP will be received:
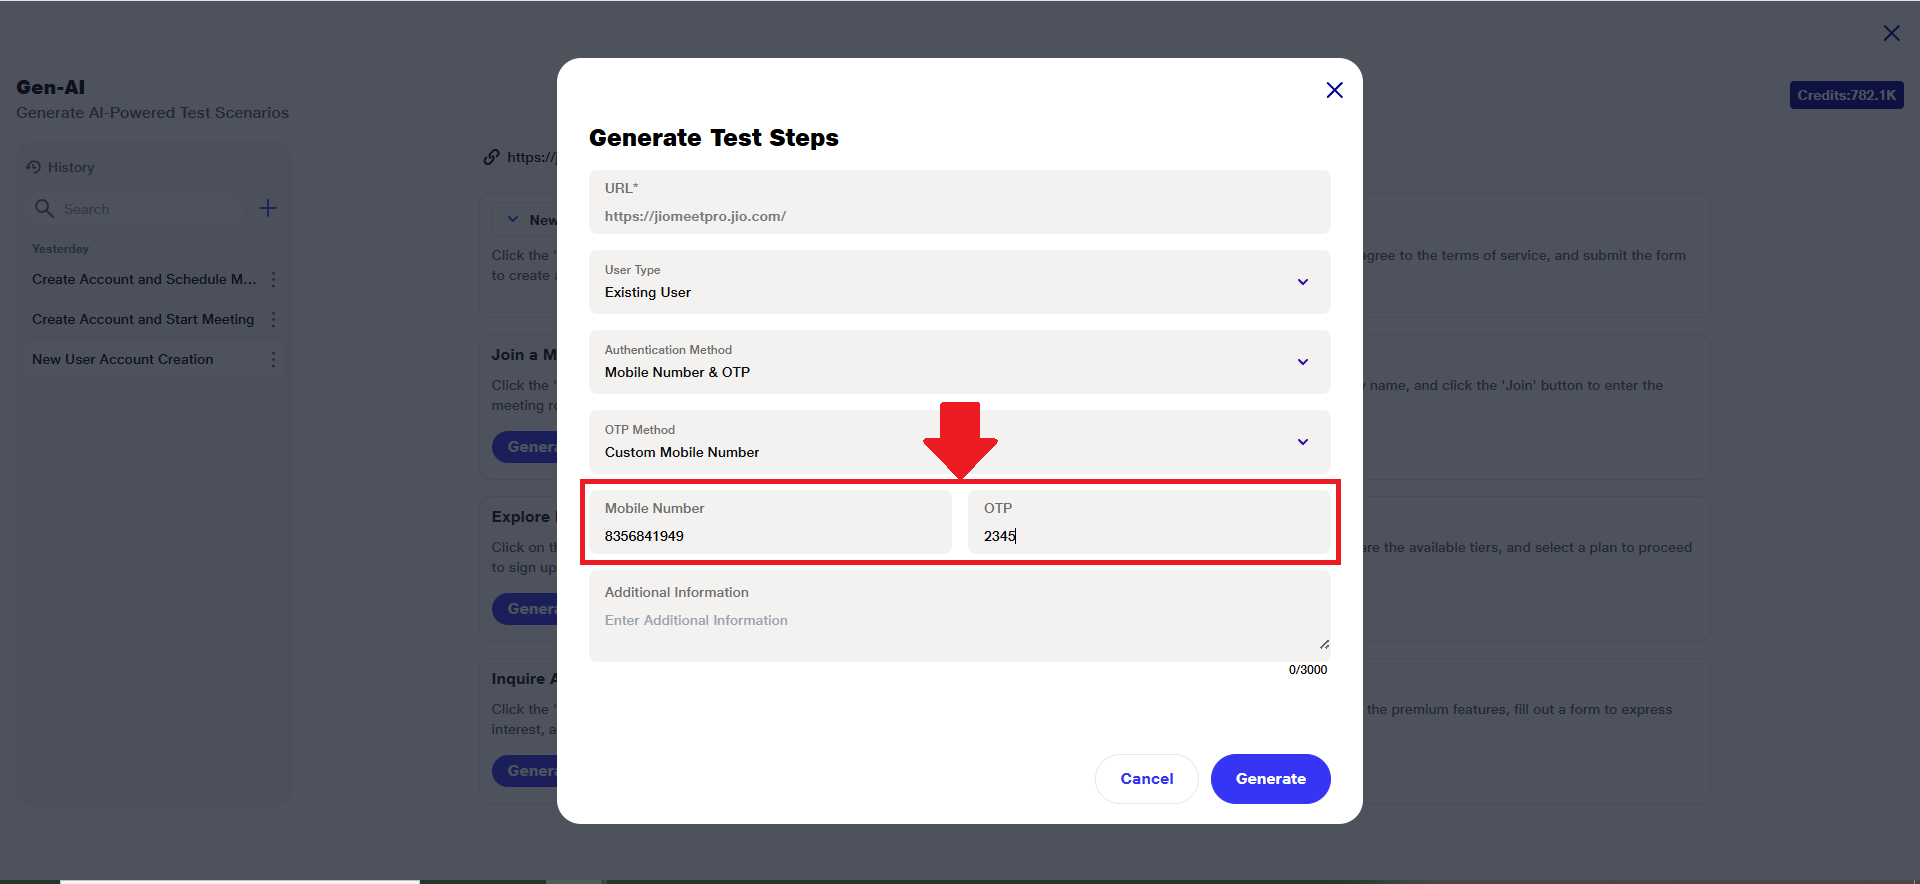
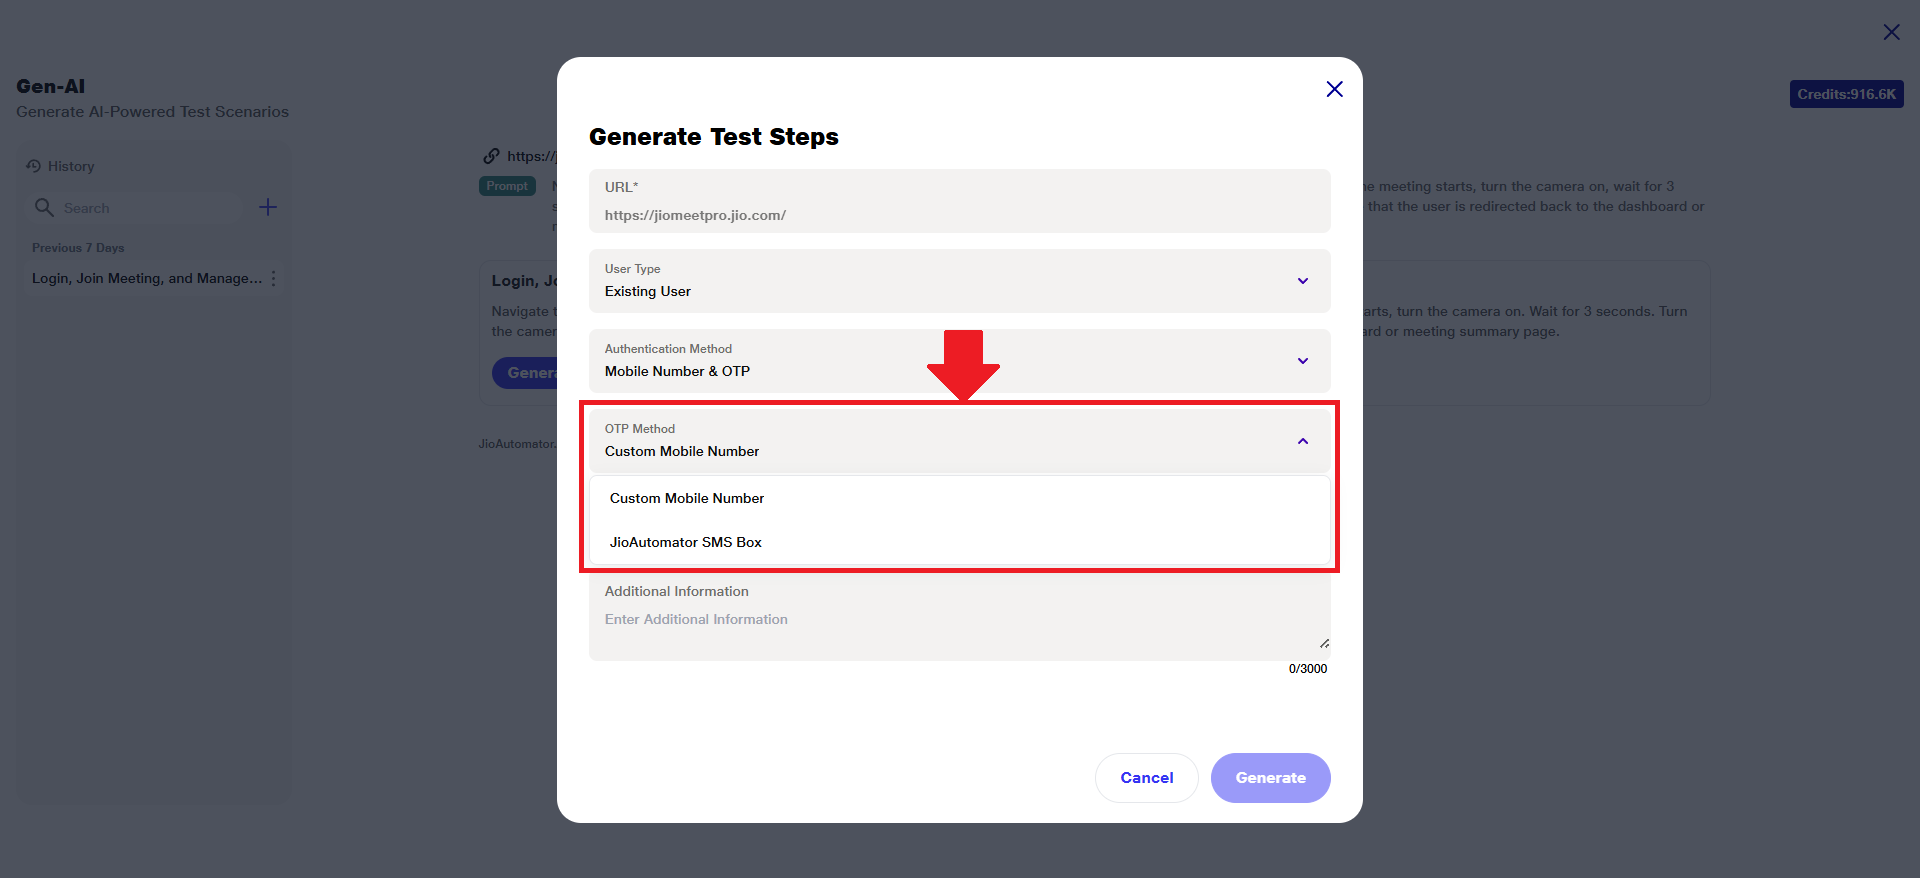 7)Custom Mobile Number (Preselected): In this method, you must provide the mobile number and the Static OTP.
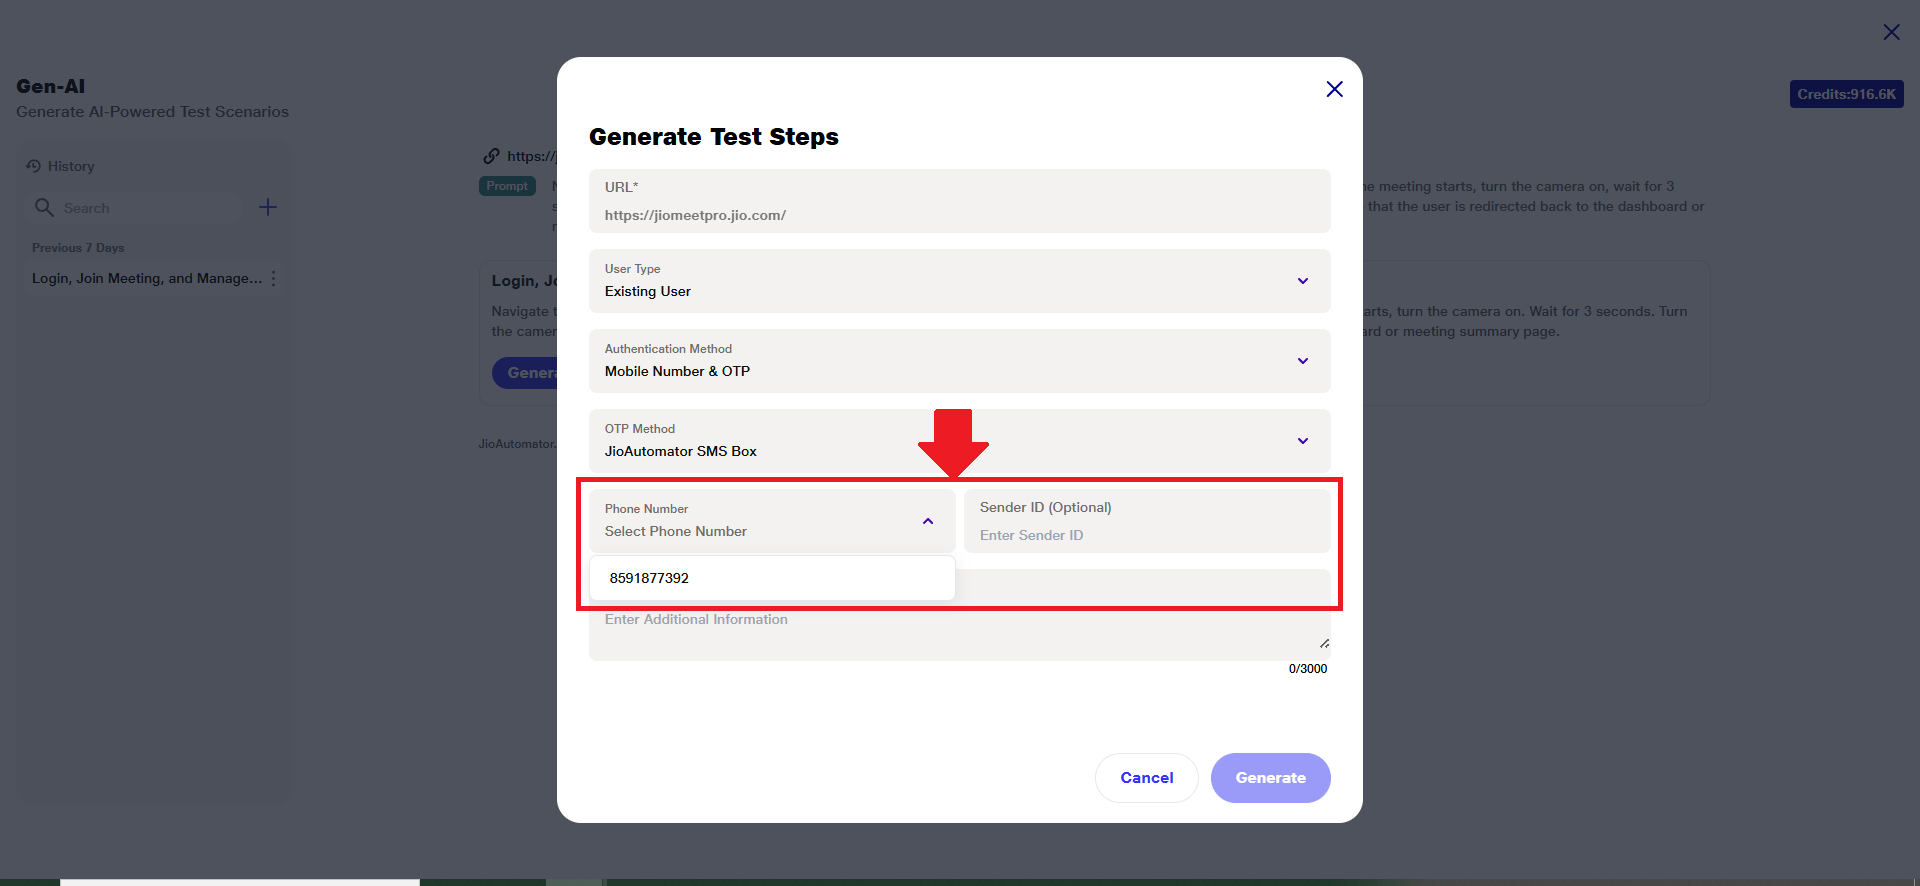
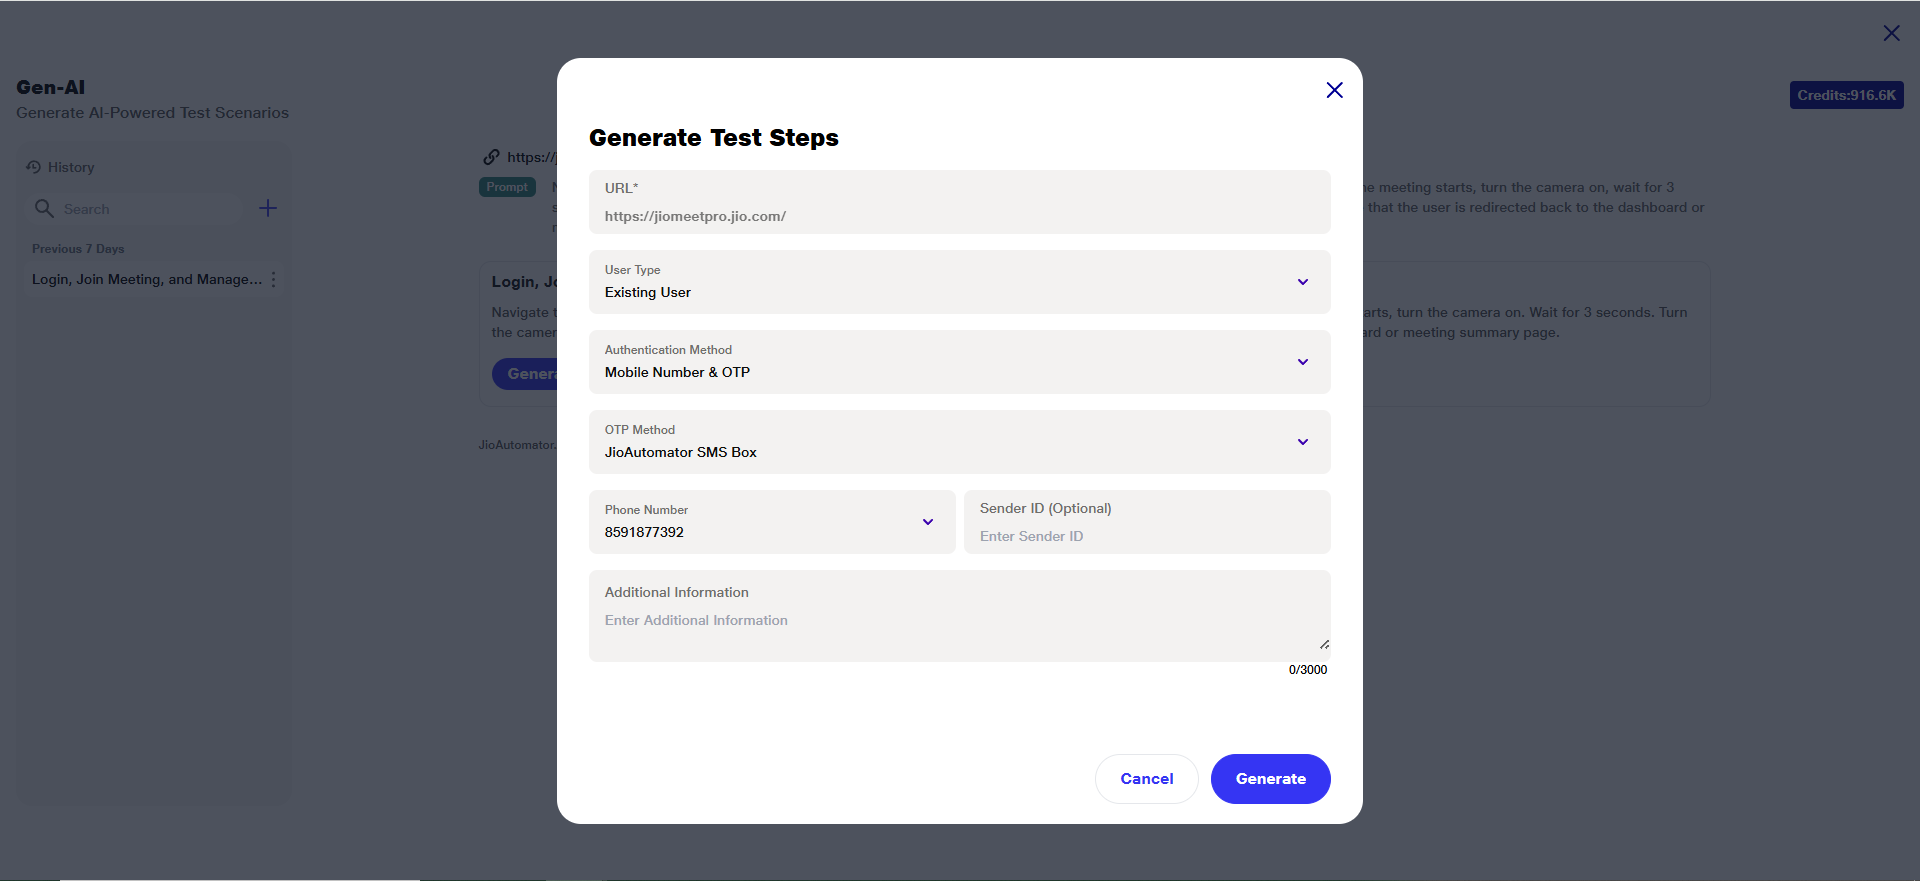
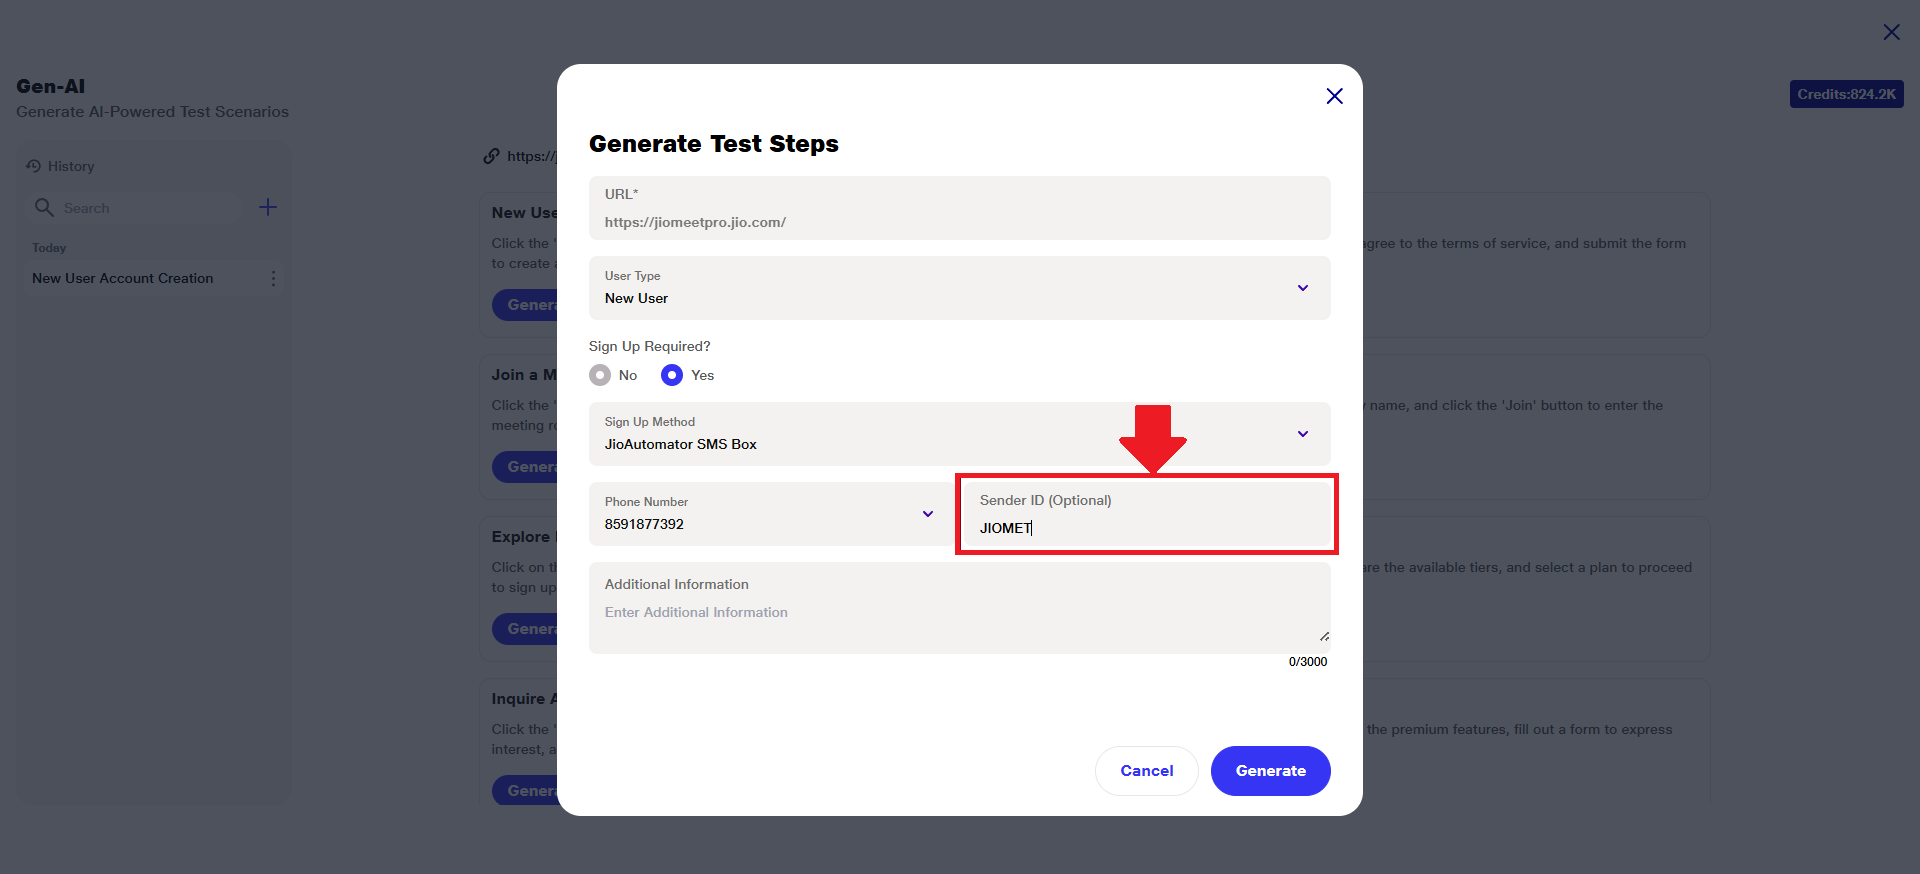
 8) JioAutomator SMS Box: Select this option if you want the OTP to be sent and received via the JioAutomator's phone number. In this case, you must also specify the Sender ID that will be used for identifying the incoming OTP message.
 9) Additionally, there is a textbox provided where you can enter any relevant additional information regarding the sign-up process or user access.
B) New User Authentication
1) When setting up the ‘New User’ type, it is important to clearly specify whether signing up is required.
2) By default, the system assumes that signing up is not required for the user. Therefore, the 'Sign Up Required?' field is automatically set to 'No'.
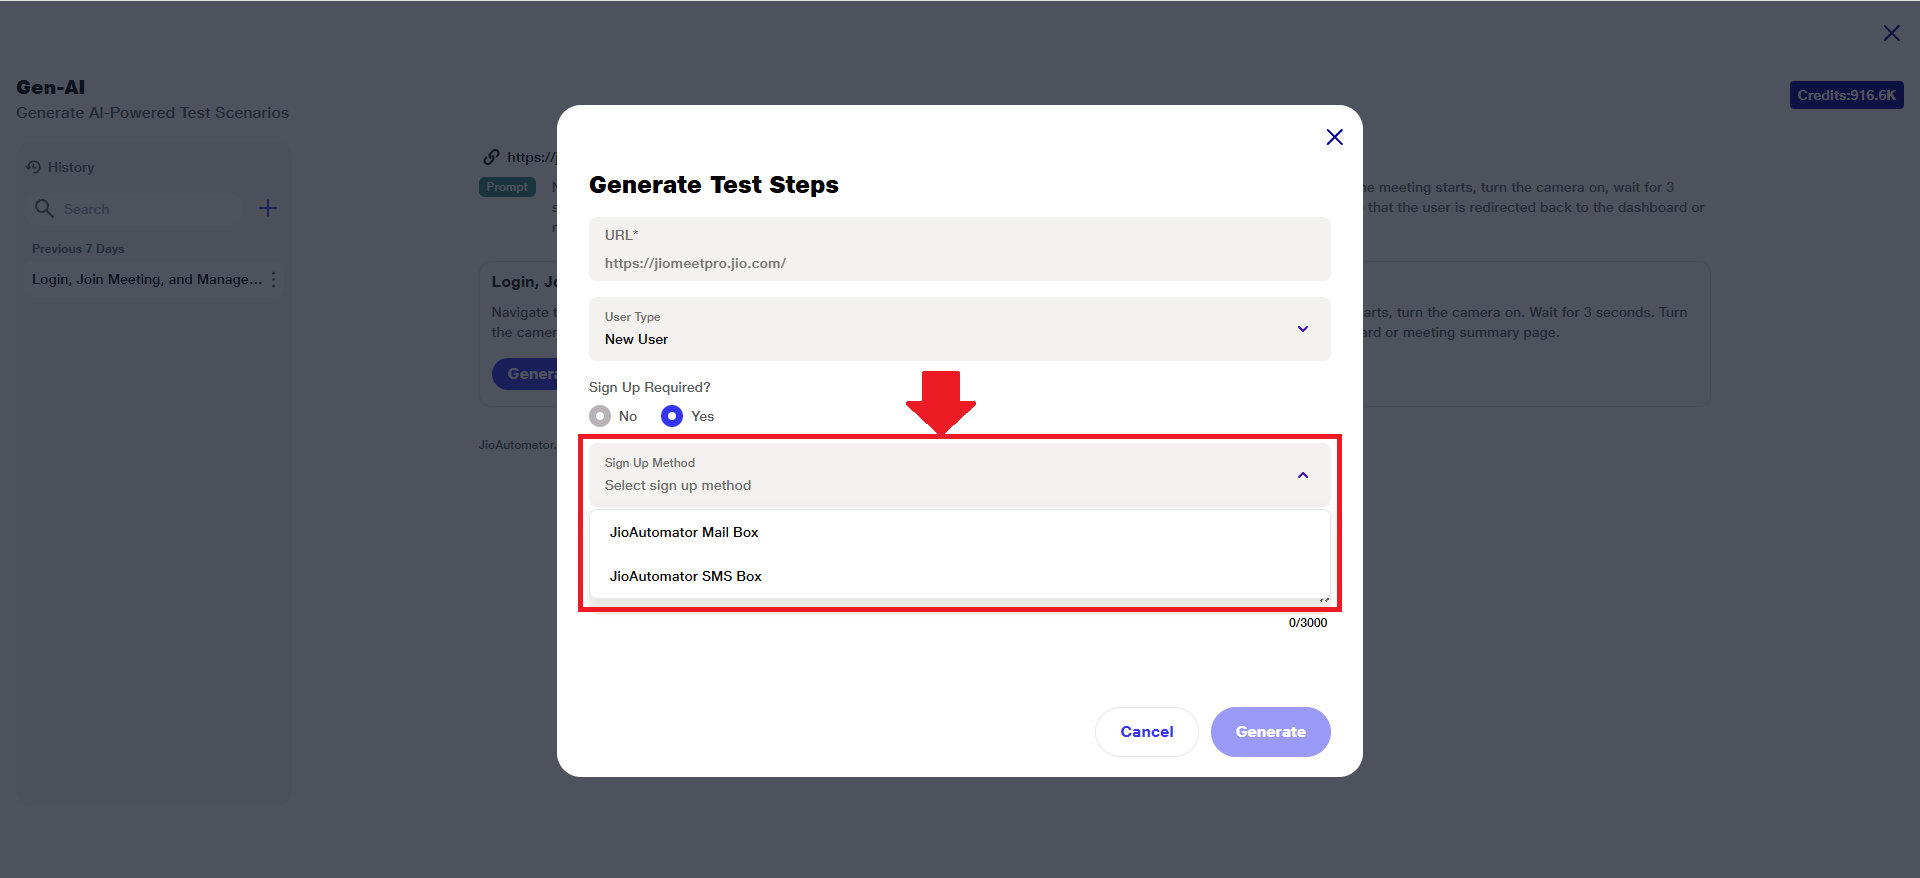
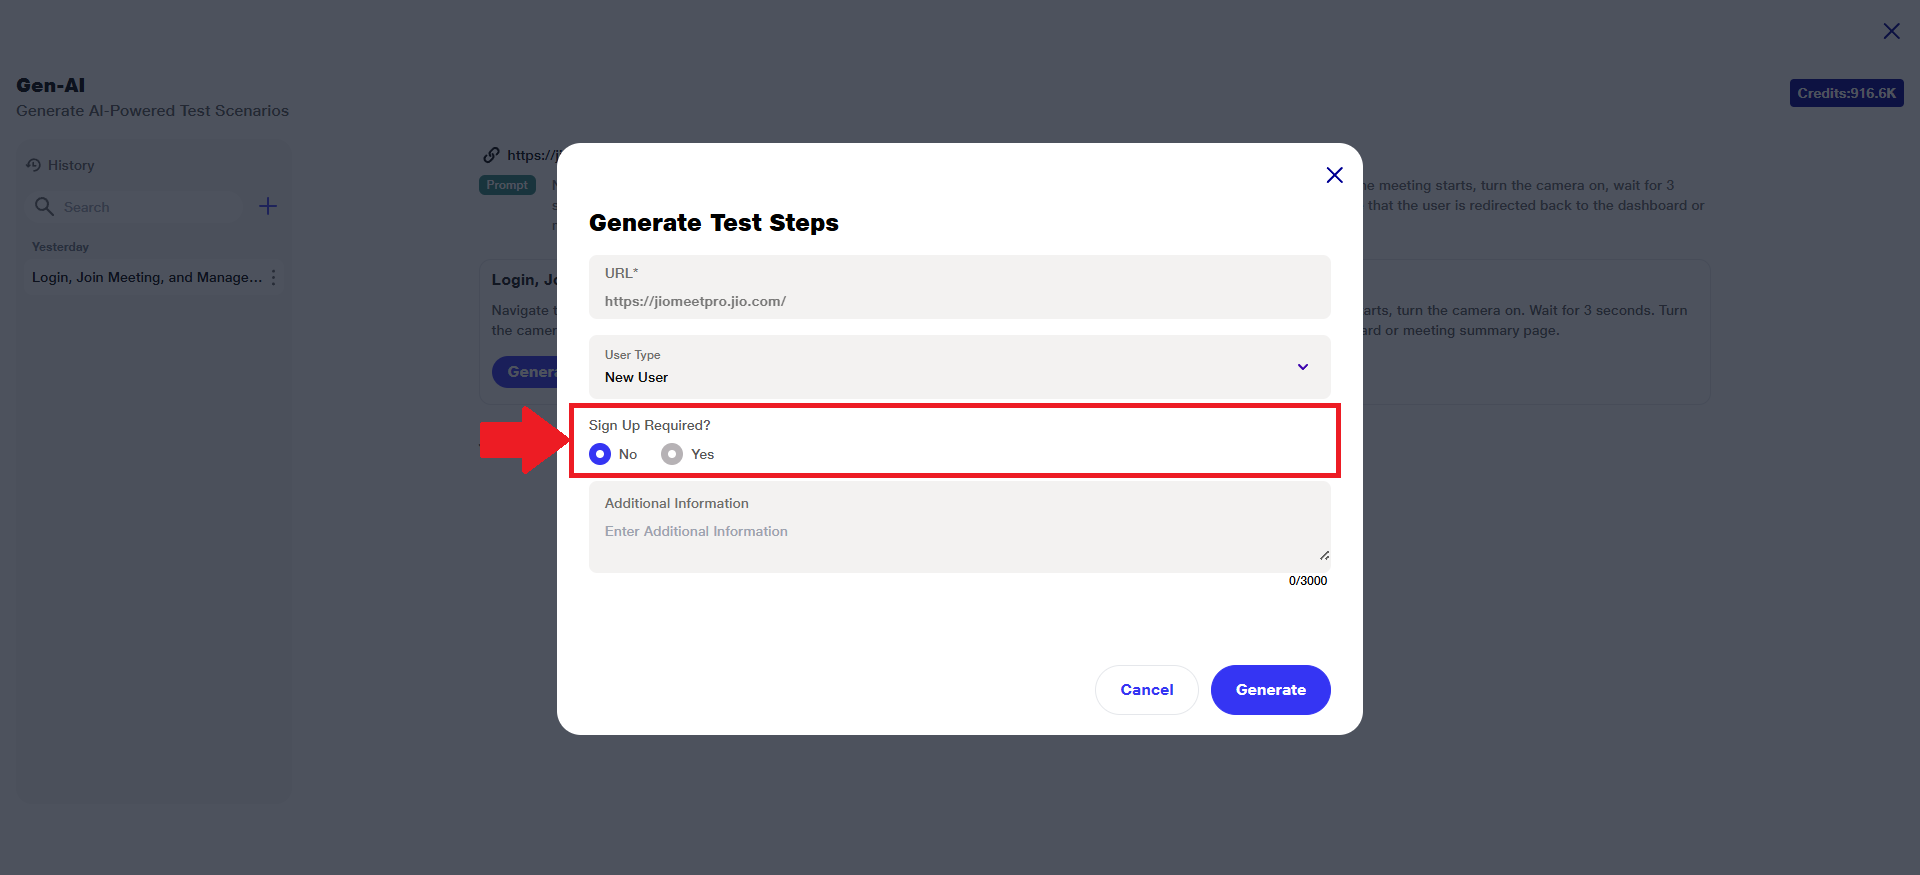 3) If sign-up is necessary for the user flow you are configuring, you must manually change this selection to 'Yes', which will then prompt additional field i.e. 'Sign Up Method'.
4) Here, you must select whether the user is required to sign up through the ‘JioAutomator Mail Box’ or the ‘JioAutomator SMS Box’.
 5) Using JioAutomator Mail Box:
a. Upon clicking ‘Generate’, the AI will:
i) Automatically create a new mailbox
ii) Fetch the associated Email Address
iii) Use this email along with a randomly generated password to perform the sign-up process
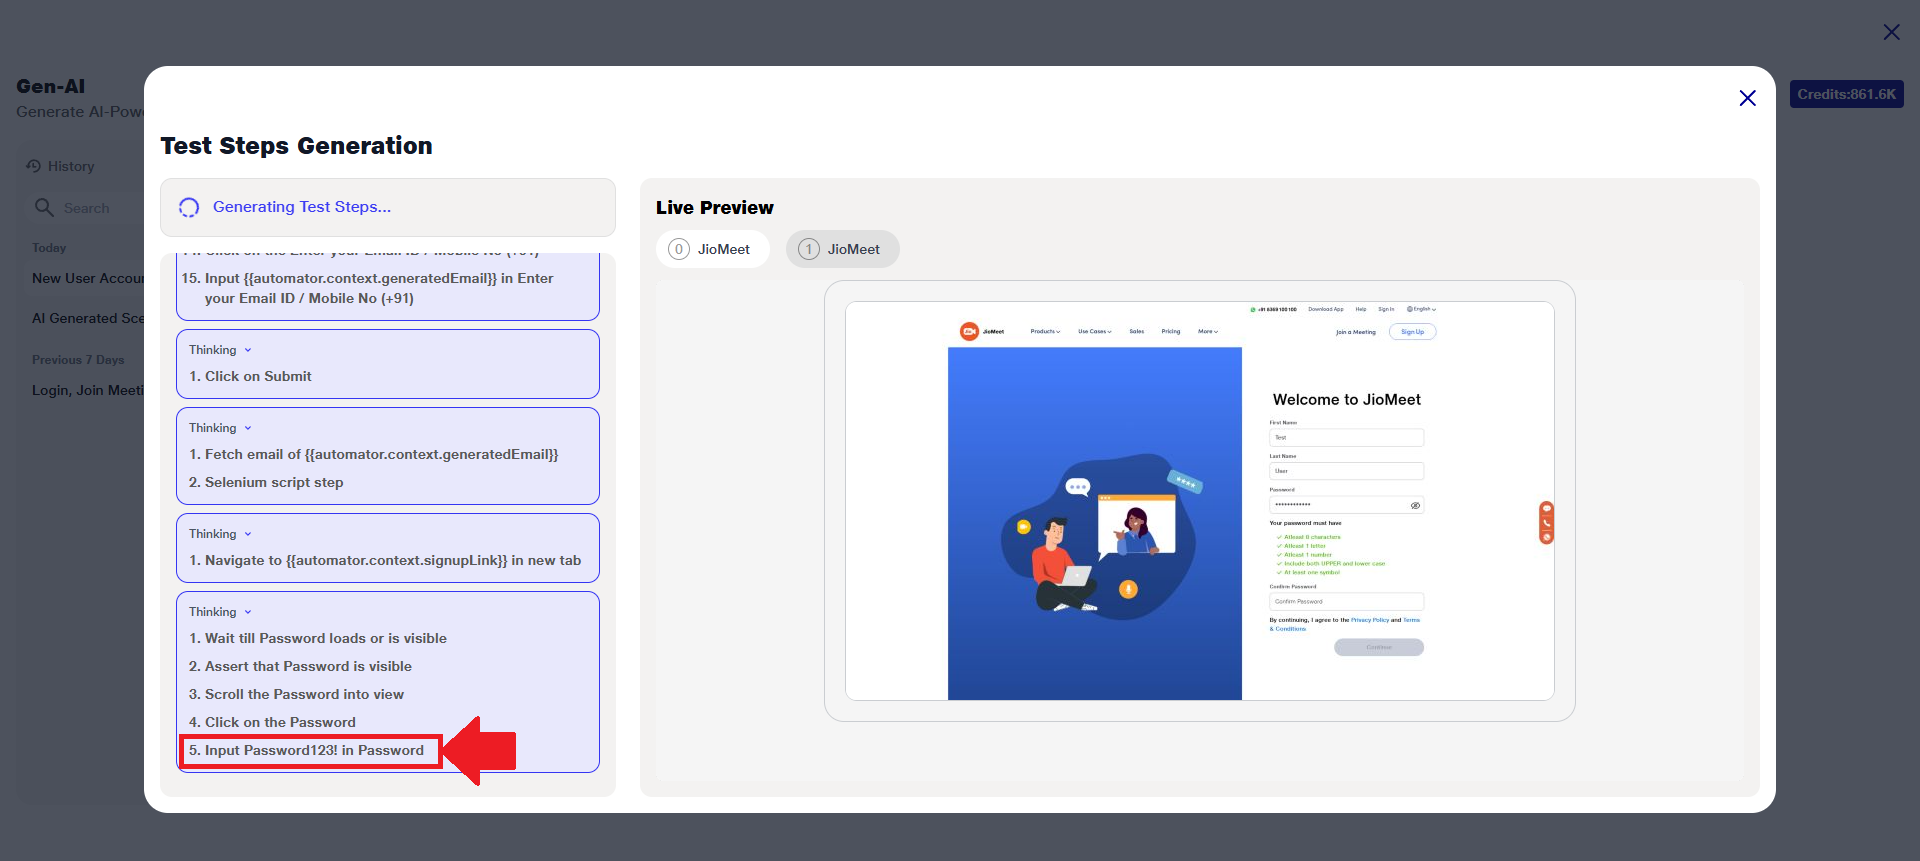 b. The user will be able to view and copy the generated Email and Password directly from the test steps.
6) Using JioAutomator SMS Box:
a. The user needs to:
i) Select an available mobile number from the dropdown list
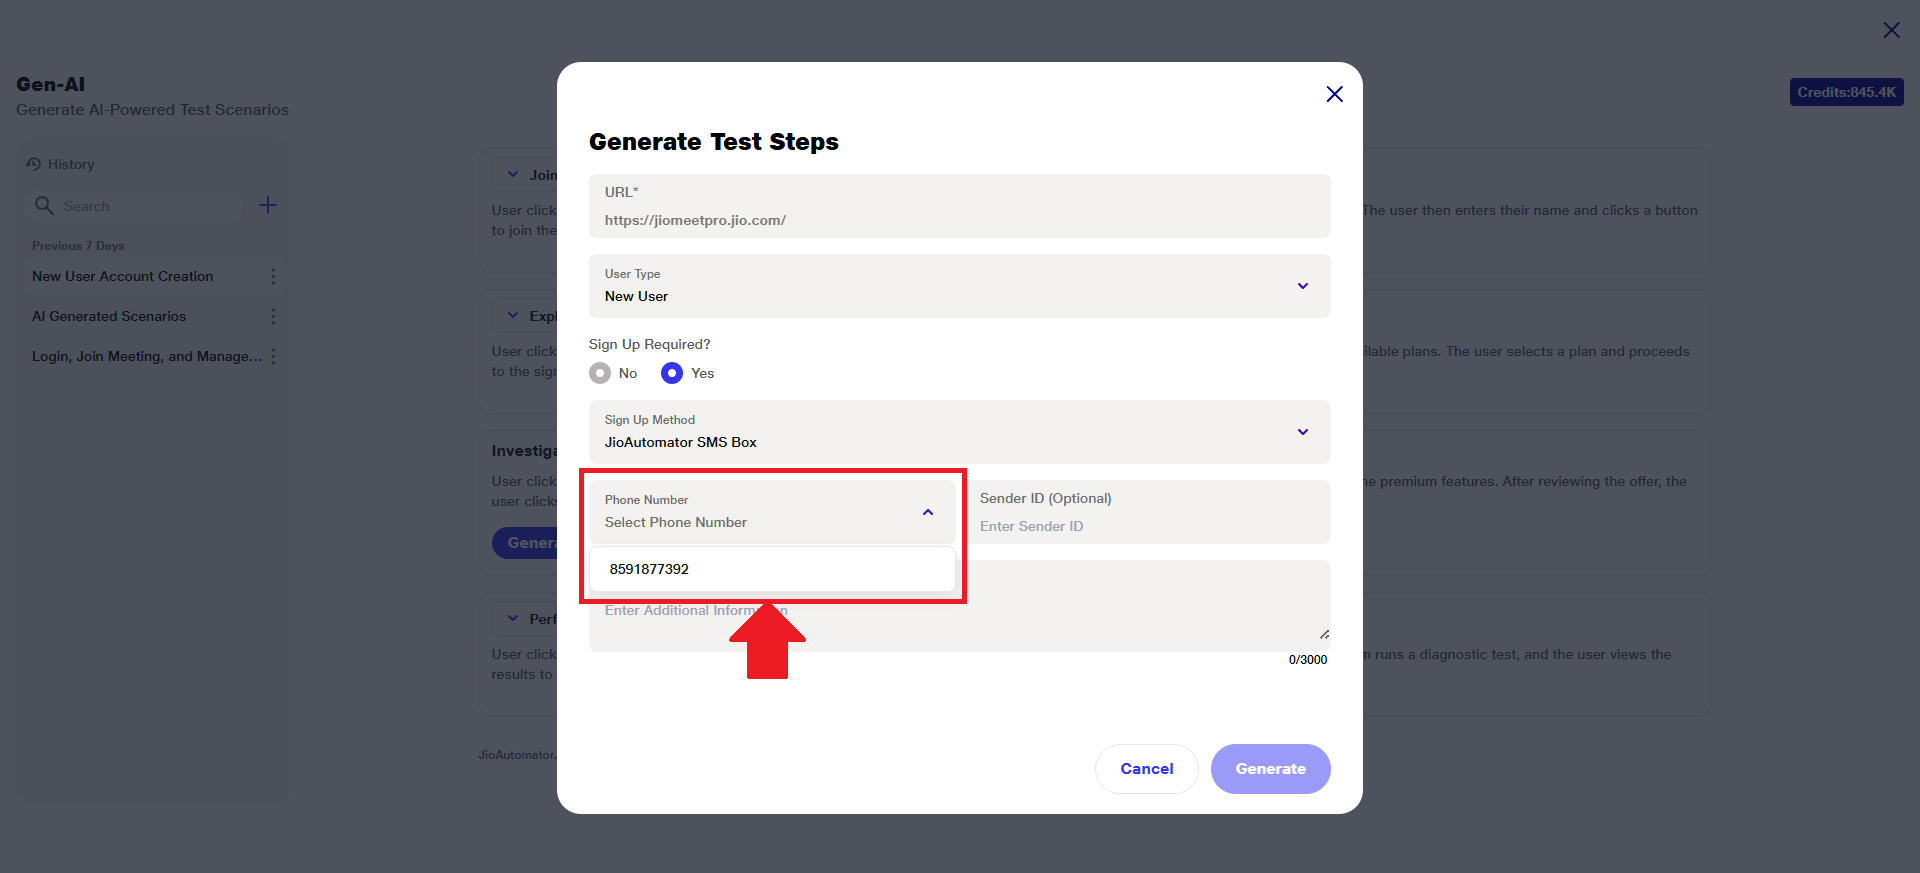 ii) Optionally provide a Sender ID, which will restrict the AI to fetch the OTP or link only from messages sent by that specific sender (useful in shared number environments to avoid incorrect data)
iii) For example, after adding an AI-generated scenario to a suite, when configuring the test step to fetch an SMS for 93****** from sender ID JIOMET, the Sender ID (Optional) field will automatically display JIOMET under step settings.
 b. Upon clicking ‘Generate’, the AI will:
i) Fetch the OTP from the selected mobile number
ii) Use the retrieved data to complete the sign-up flow.
 7) Kindly note that if the user does not have access to JioAutomator's Email and SMS inbox, then only the following options will remain active:
a. Guest
b. Existing User (using Username and Password or the Custom Mobile Number flow).
All other options will appear disabled, and the Enterprise option will be shown next to them as an alternative.
8) After selecting the appropriate User Type from Existing or New User and completing all the required details based on the selected category, click on the ‘Generate’ button to proceed.
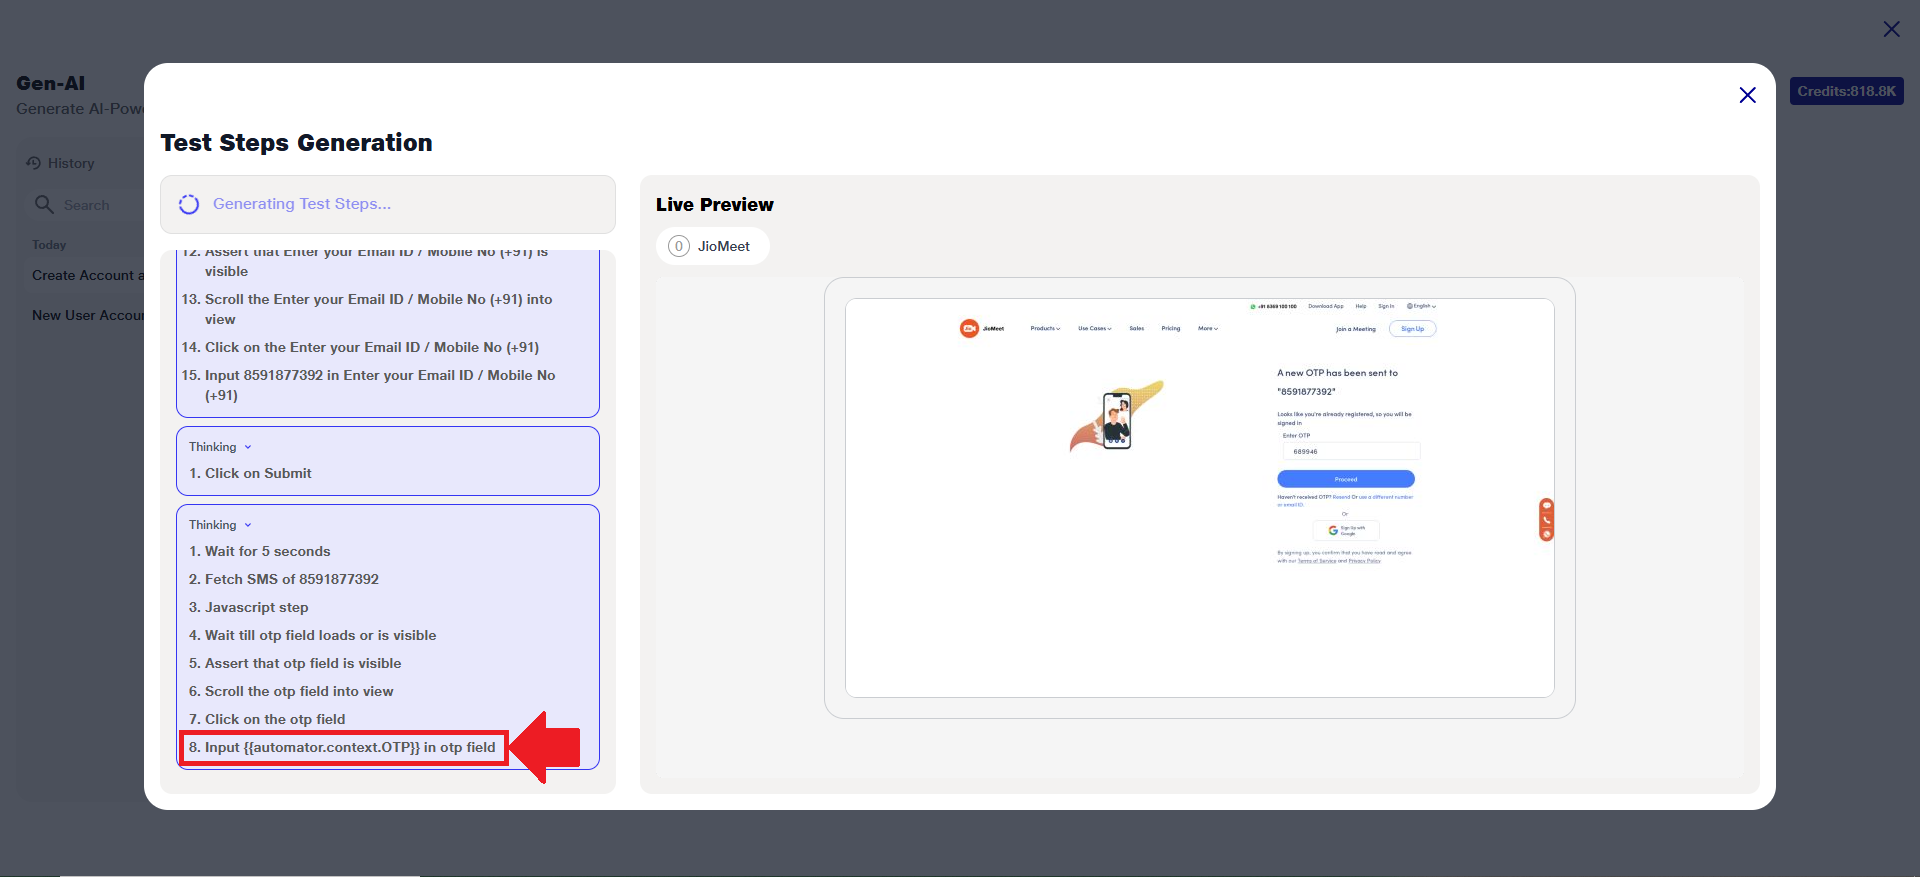
 9) This will initiate the step generation & live preview.
C) Step Generation
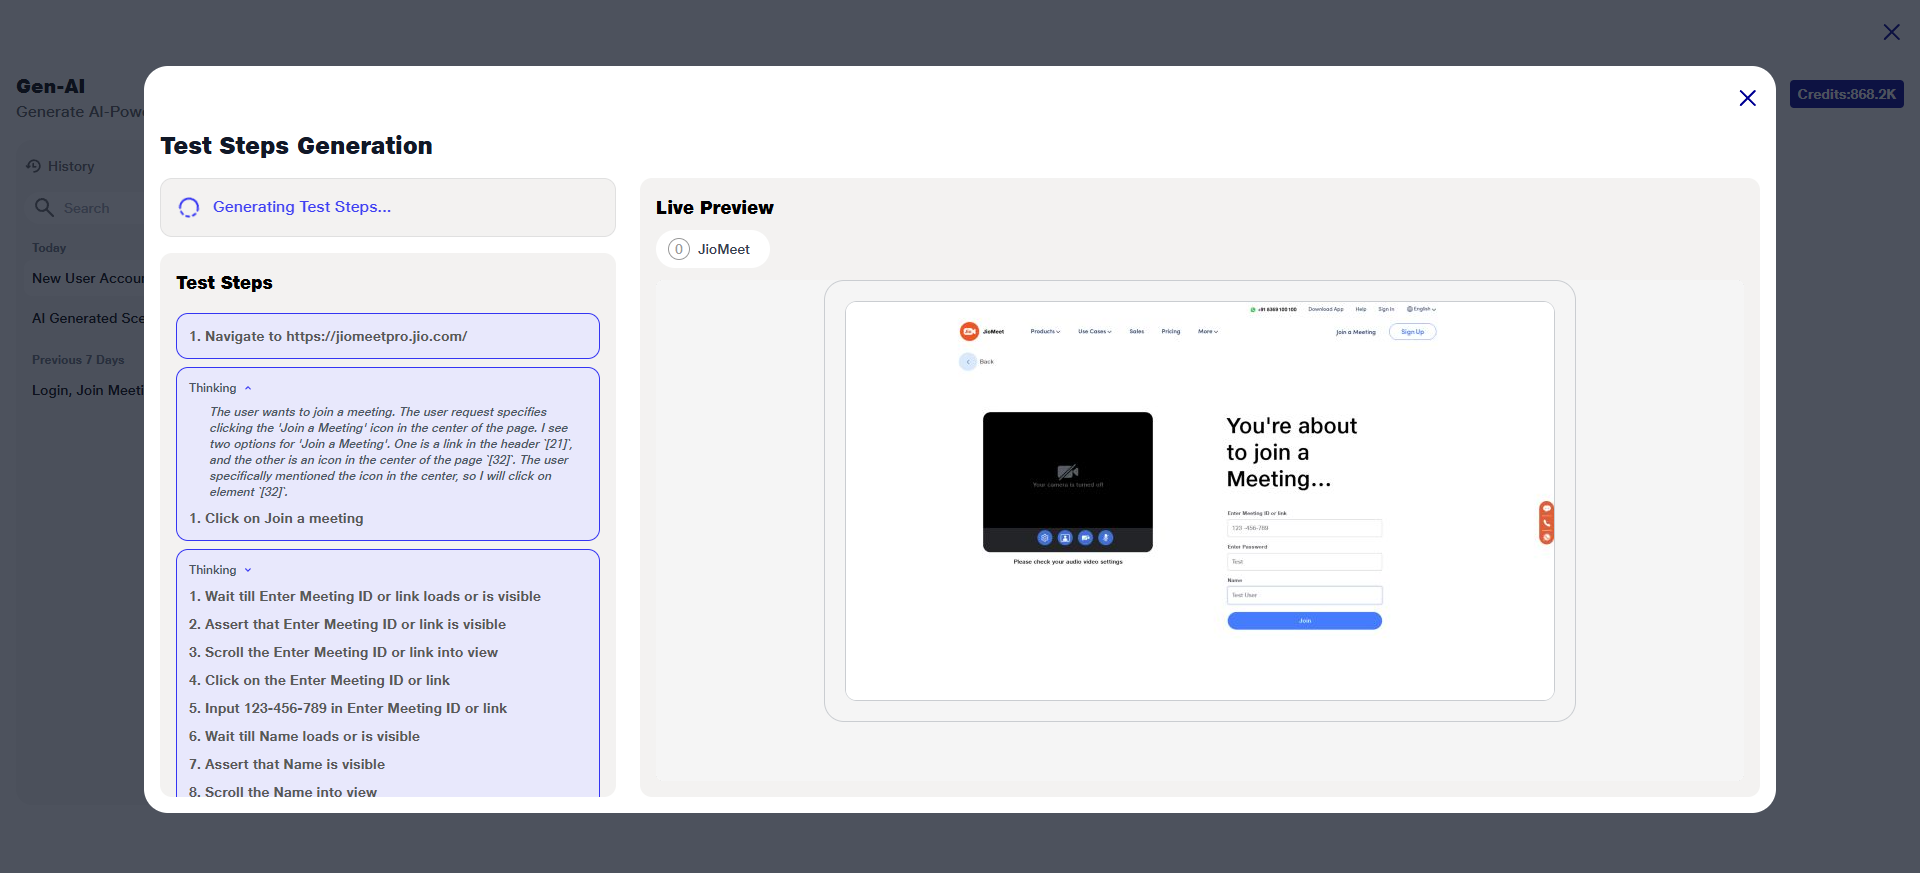
1) The system will automatically create test steps based on your selected inputs (e.g., sign-up method, authentication method, mobile number, etc.).
2) These test steps simulate the actual flow that a user would go through during the actual workflow of the URL.
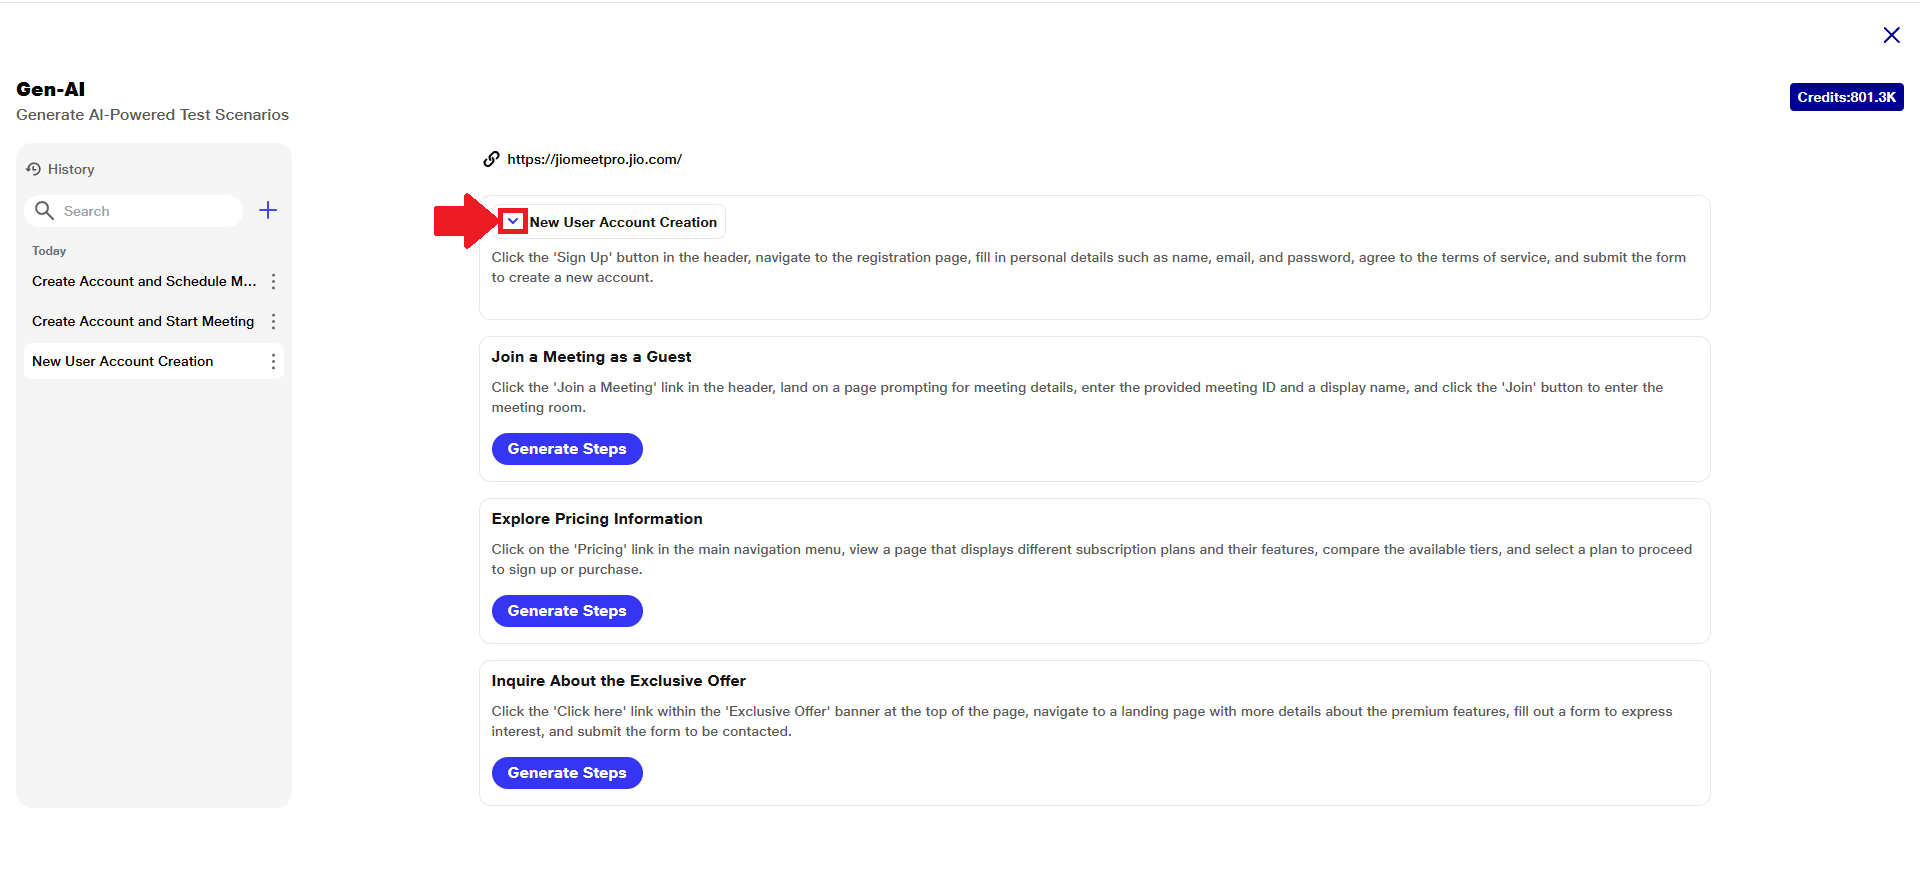
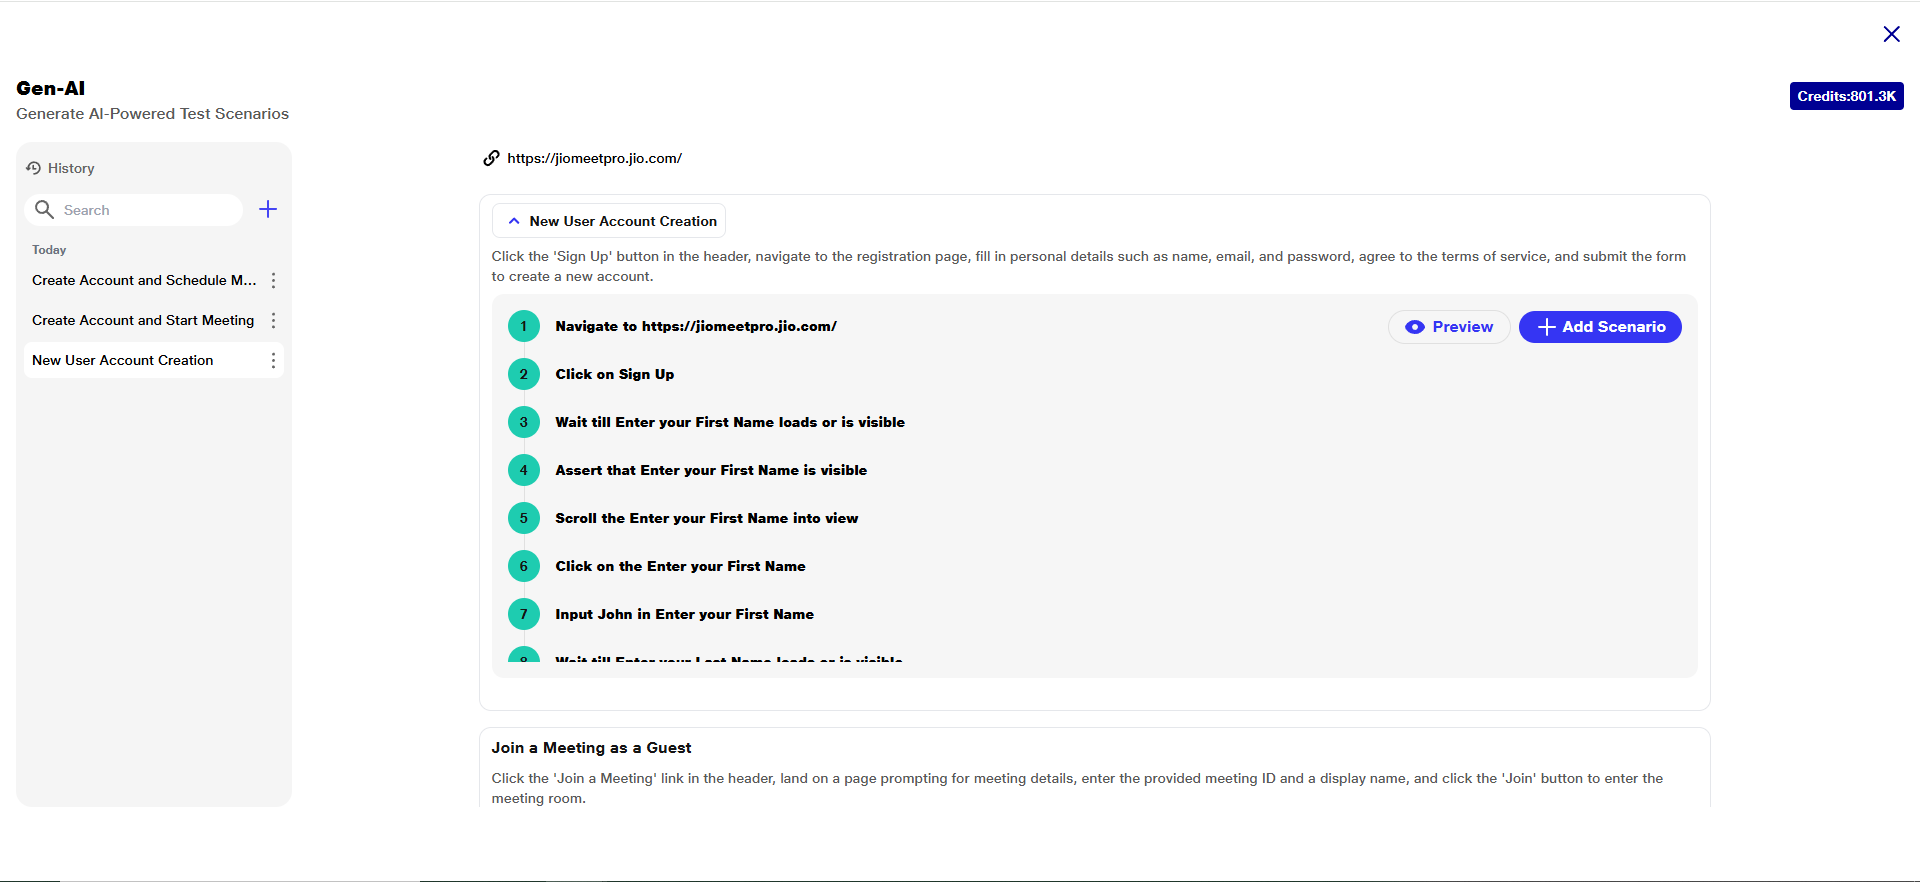
3) Each generated test scenario is displayed with a collapsible dropdown beside its name. To view the detailed steps of a scenario, click on the dropdown arrow located next to the scenario title.
 4) This expandable view helps in quickly understanding the logic and flow of each scenario without cluttering the interface.
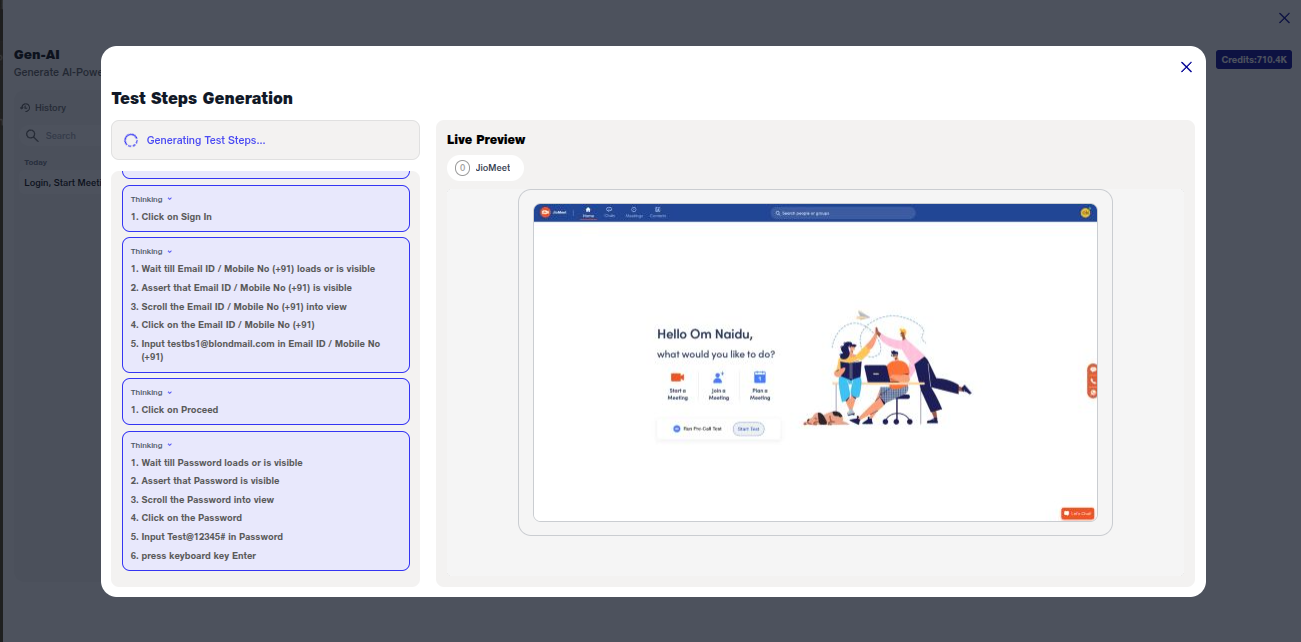
D) Live Preview
1) A Live Preview panel will be displayed.
2) It provides a real-time simulation of user interaction flow.
3) This preview allows you to:
i) Visually verify each test step
ii)Ensure the correct fields and values are being used
iii)Identify and correct any misconfigurations before executing or saving
 4) Once all the test steps have been successfully generated, the system will display the "Test Steps Generated Successfully" confirmation message in the Live Preview panel.
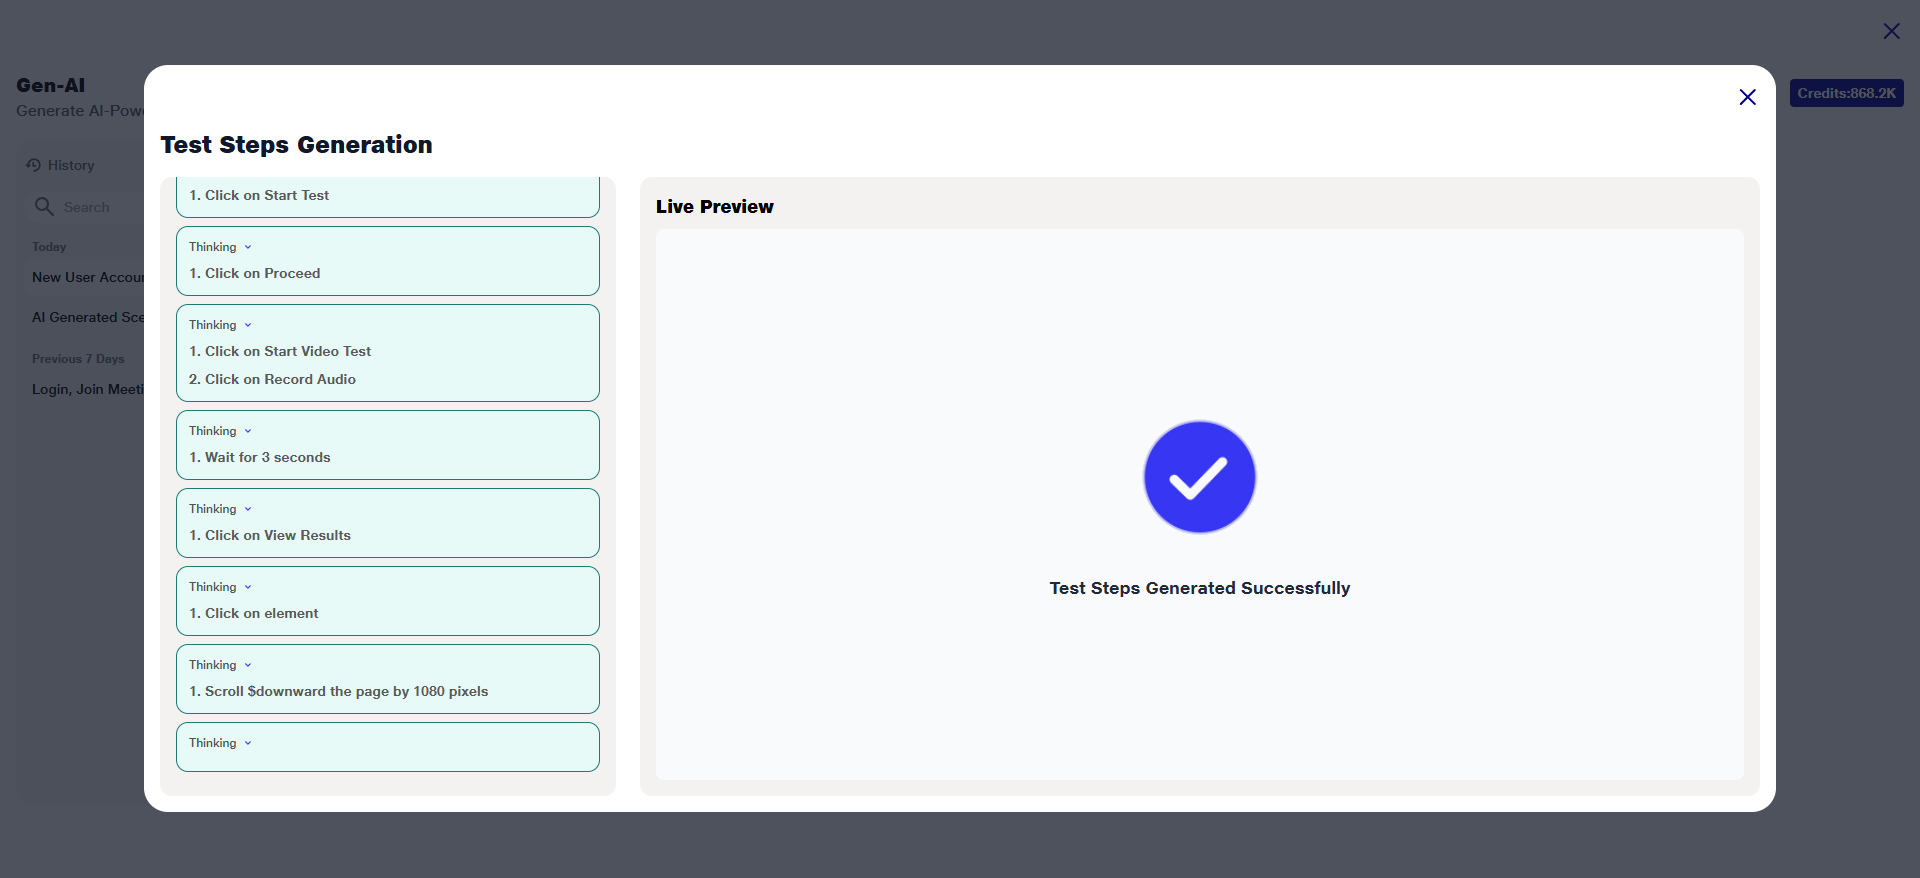 This message indicates that the test steps are now ready for review and further action.
5) Once the test cases are successfully generated, the ‘Generate’ button will be replaced with the ‘Preview’ and ‘Add Scenario’ button.
 This allows the user to proceed with previewing and adding the generated scenario to a test suite.
6) **Kindly Note that:**If the AI encounters a block or limitation during simulation (such as an unexpected page behavior or an authentication barrier), it will gracefully stop execution without crashing or proceeding with invalid steps.
i) All steps completed up to that point are still captured and displayed to the user.
ii) This allows users to review progress, identify issues, and manually refine or continue from where the AI is left off.
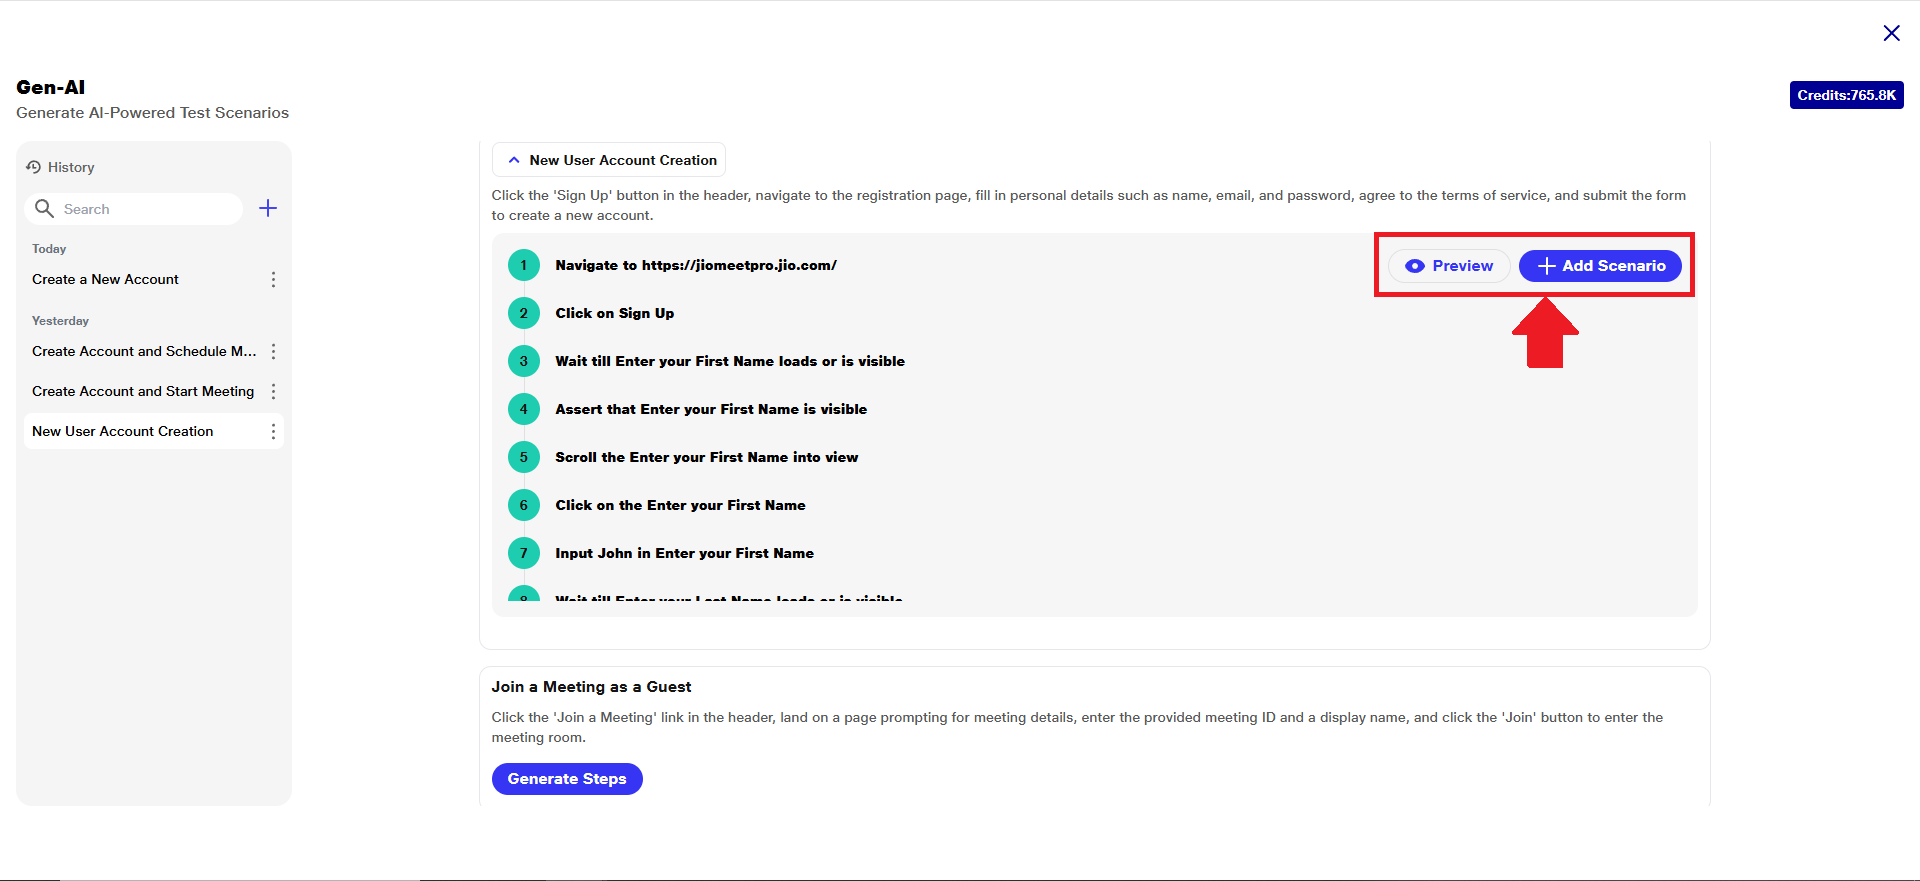
4) Adding AI Generated Scenario
a) Once the AI-generated step is created, it will be displayed with a down arrow icon before its name.
 b) Click on the down arrow to expand and view step actions.
 c) Click the ‘Preview’ button.
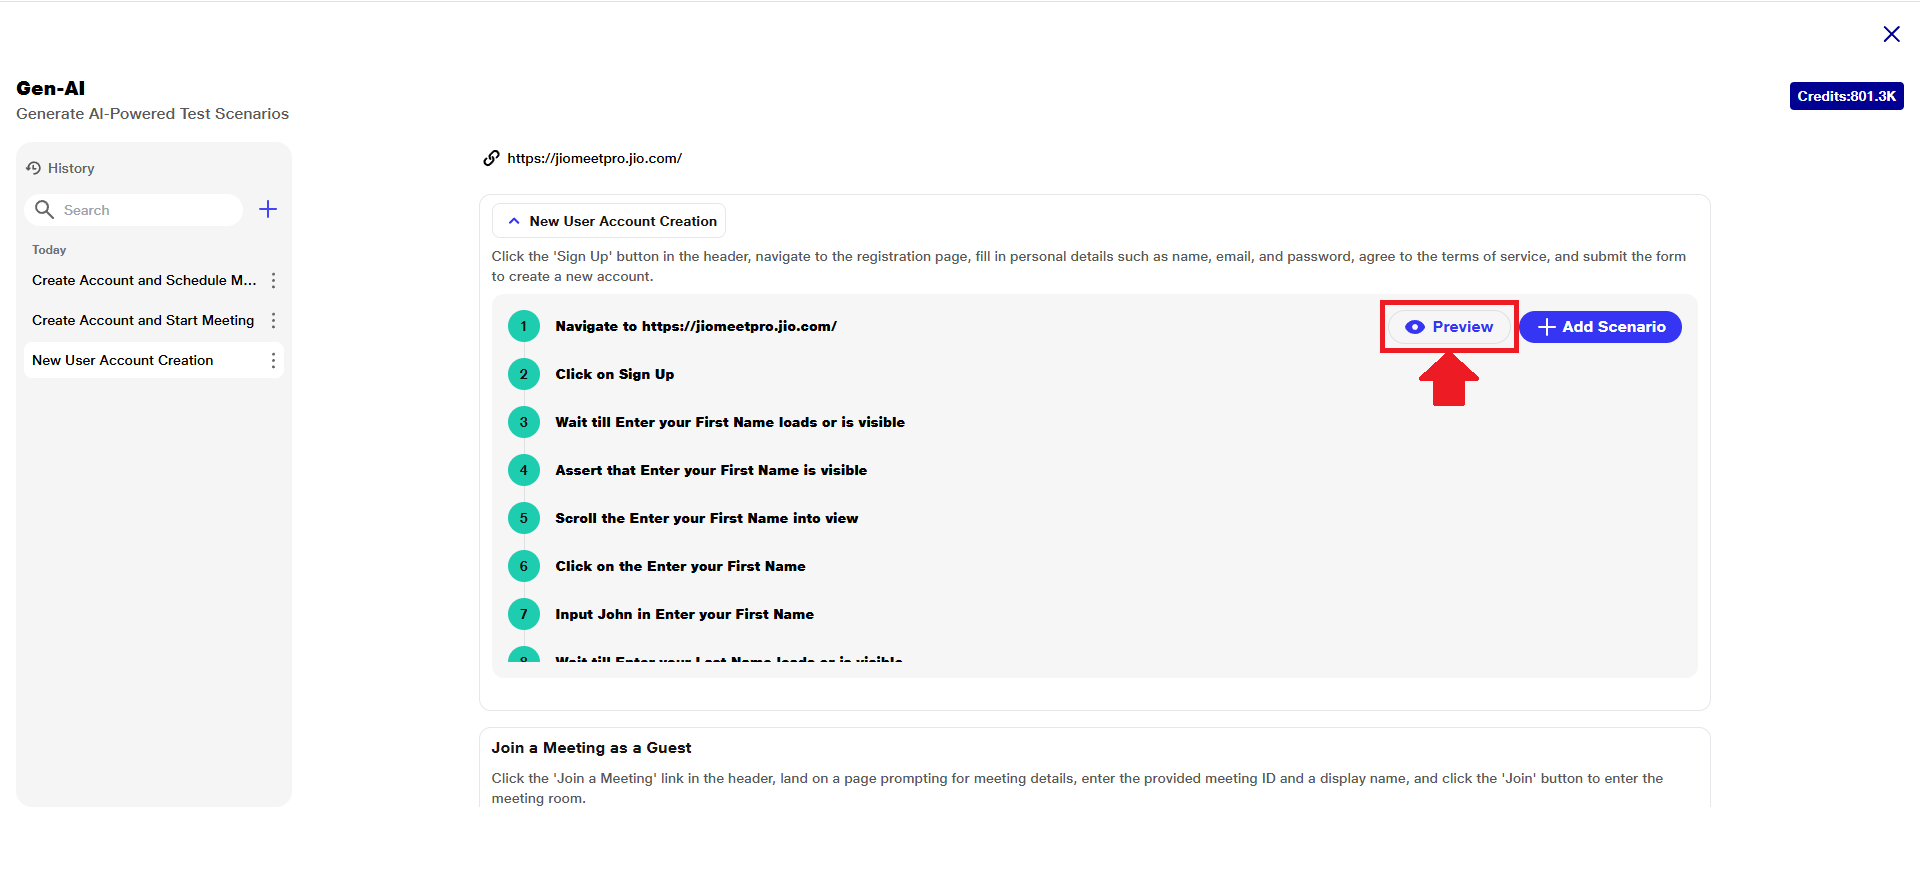 d) A user can view a live simulation of how the step will run.
 e) Click the ‘Add Scenario’ button.
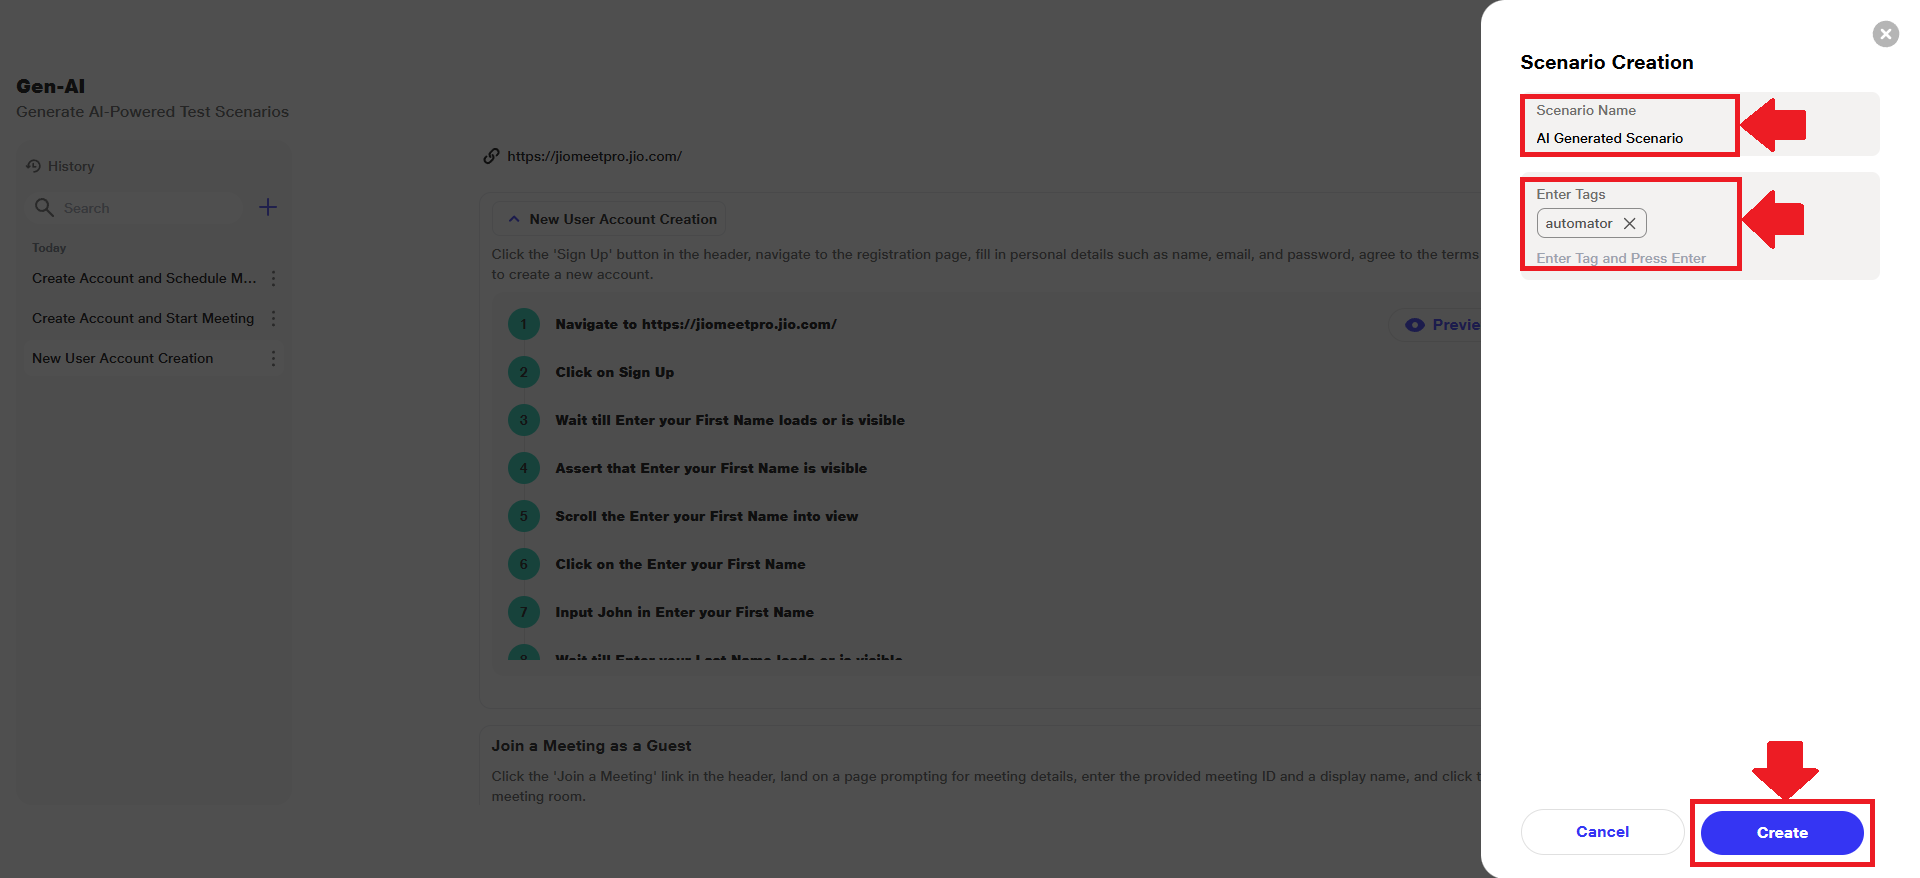
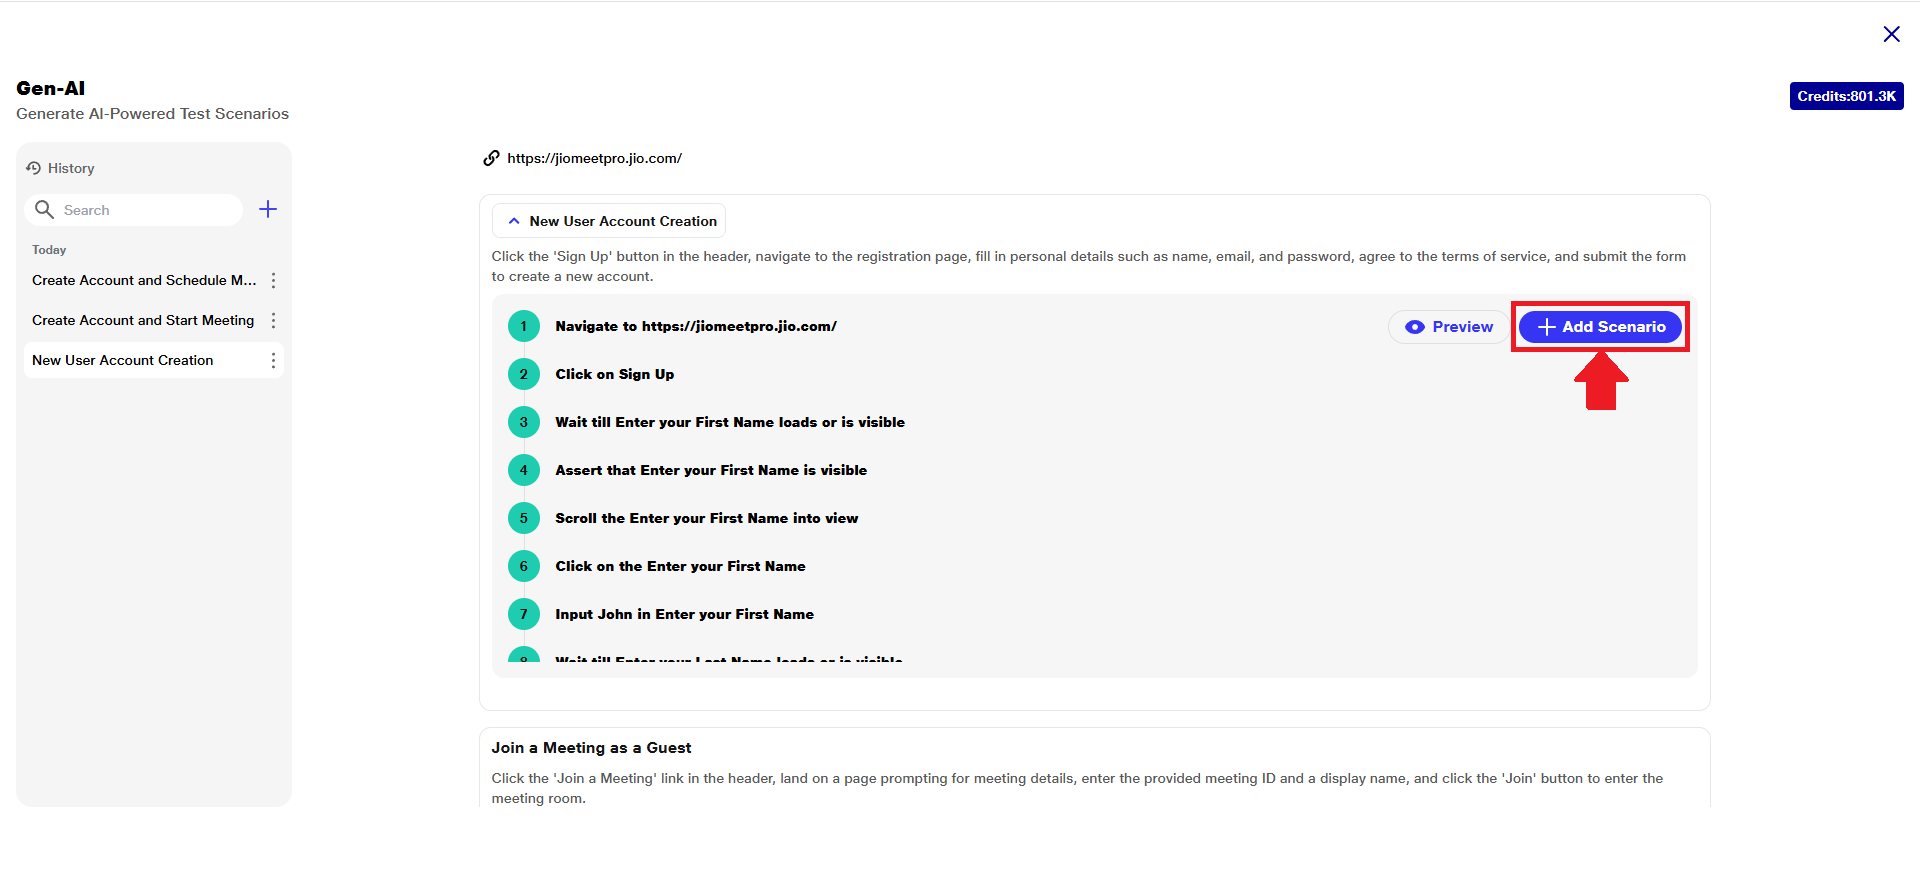 f) This will open the “Scenario Creation” tab on the right-hand side of the screen.
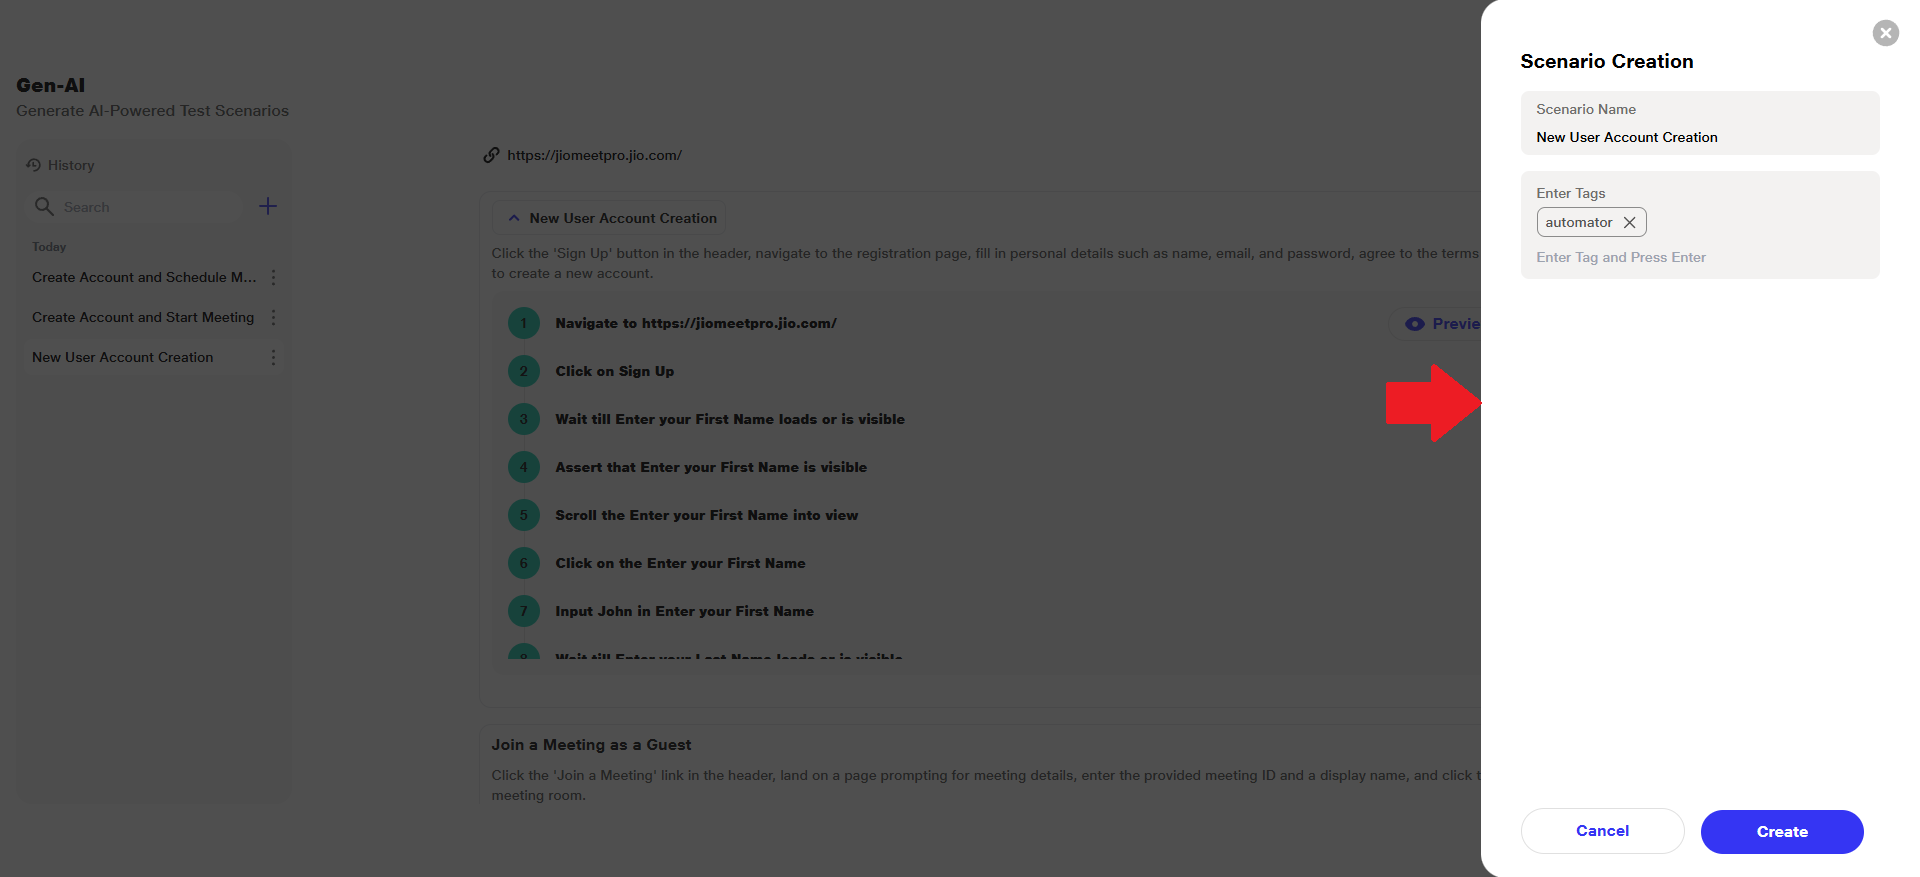 g) Provide a name for the AI-generated scenario and add one or more tags for easy identification and filtering. Click the ‘Create’ button.
 h) A confirmation message will appear: "Scenario_Name added successfully!"
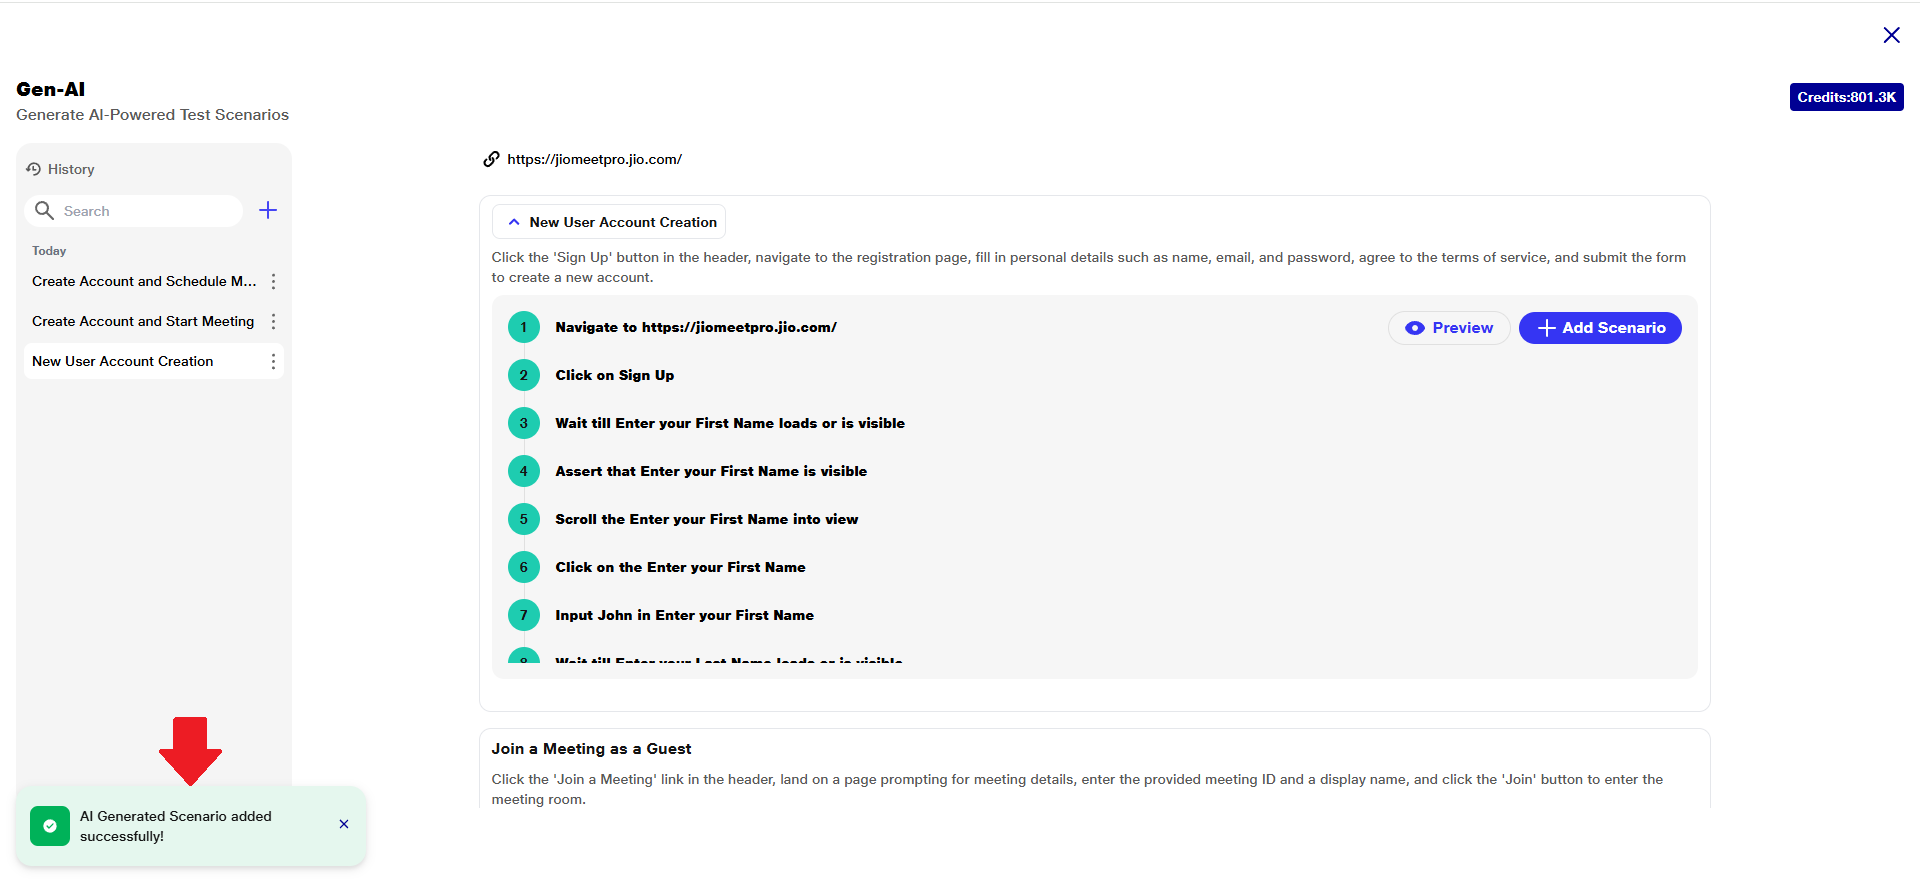 i) The newly added scenario will now be listed in the respective suite where it was created.
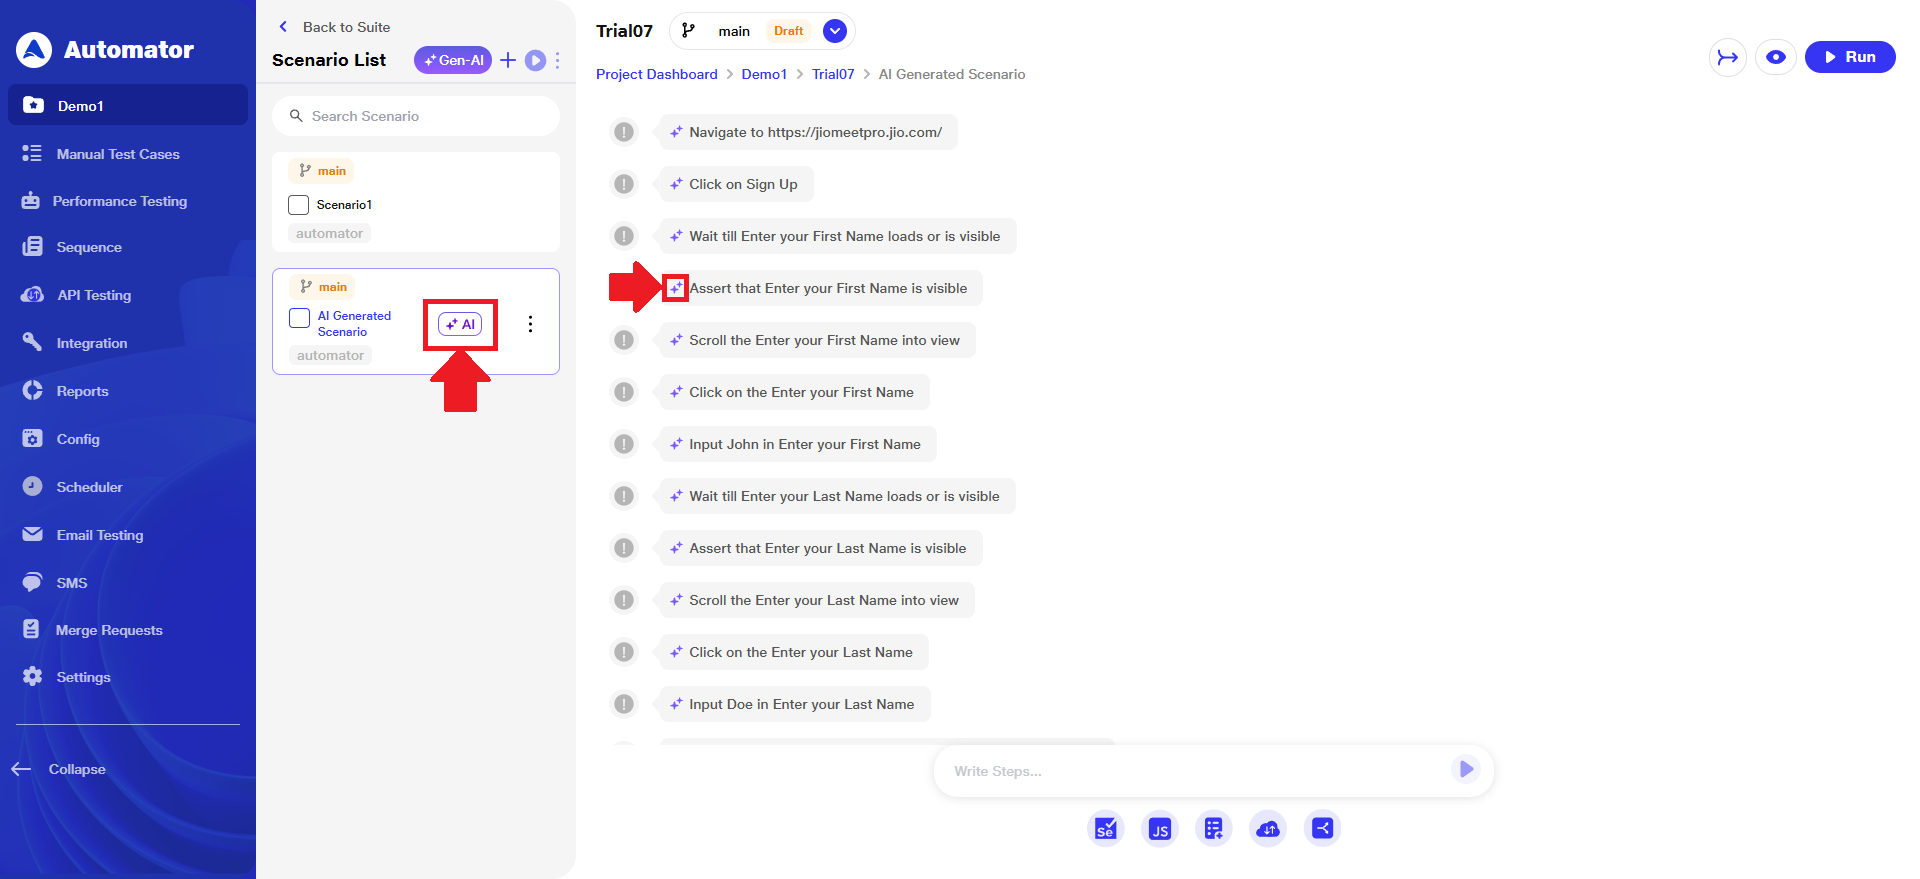 It will be marked with an ‘AI’ tag, indicating that it was generated by the AI.
5) Test Generation History
a) When a user initiates test generation for the first time, either based on a URL, History panel becomes available on the left-hand side of the interface. Afterwards, new threads will always appear at the top of older threads. Also, a search bar is there if the user requires searching of any thread.
 b) Each test case history will be retained for 7 days.
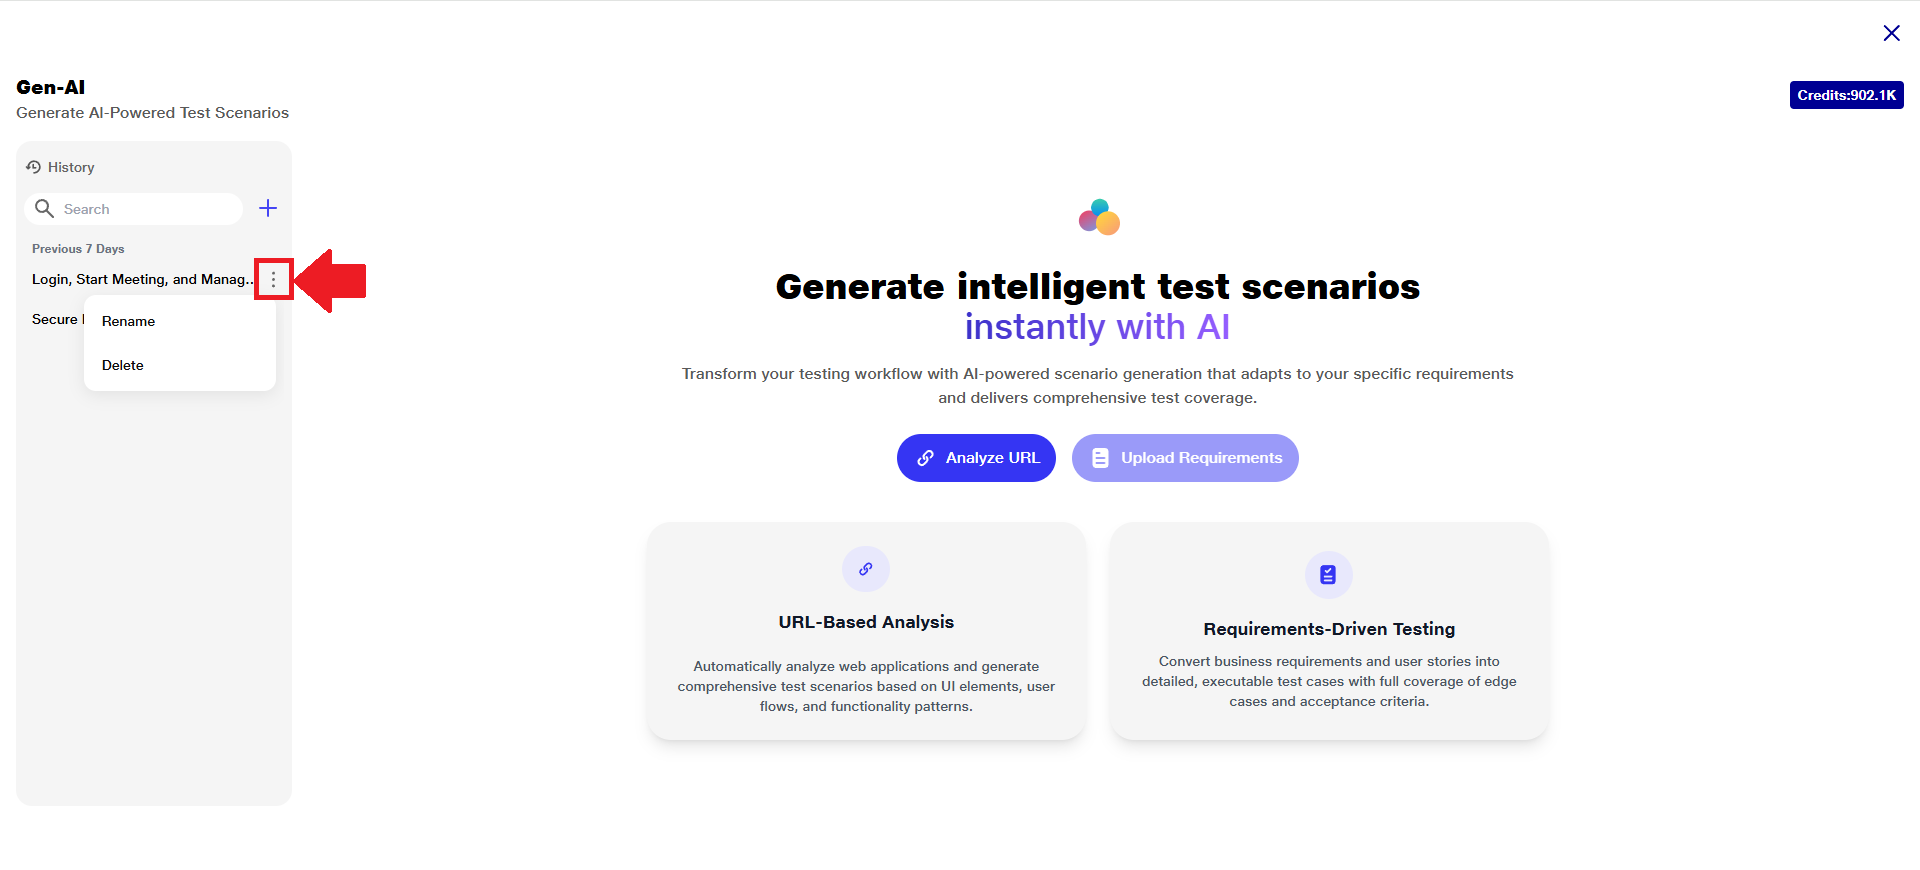
c) Each entry in the History section comes with a three-dot menu (⋮) on the right-hand side. This menu provides quick actions you can perform on individual test steps.
d) Available Options:
i) Rename: Allows you to rename the test step for better clarity or organization. Useful for identifying specific test scenarios, especially when managing multiple test runs.
ii) Delete: Permanently removes the selected test step from the history list.
Note: This action cannot be undone. Make sure to review before deleting.
These options help users keep their test history organized, clean, and easy to manage.
 e) While any test generation window is open, a “+” (Generate New Test Scenarios) button is available within the ‘History’ interface. This allows users to dynamically create additional test step cases without closing or exiting the current test flow.
Benefits
1) Efficiency & Time Savings:
a. Automatically suggests or generates test steps, significantly reducing the time needed for manual authoring.
b. By reducing repetitive tasks and manual validation, testers can focus on edge cases and complex scenarios.
c. Real-time previews reduce back-and-forth cycles by catching issues early in the design phase.
2) Accuracy, Coverage & Quality:
a. AI-generated steps help minimize human errors and ensure alignment with application behavior.
b. Intelligent step generation can suggest overlooked paths or scenarios, improving overall test completeness.
c. Standardized, AI-driven steps ensure consistency across different testers and test cases.
3) User Experience & Accessibility:
a. Interactive previews and intelligent suggestions make the authoring process more dynamic and user-friendly.
b.New or non-technical testers can quickly become productive with the help of guided step suggestions and visual previews.
c.The combination of AI and live preview creates a smoother, more intuitive workflow for test authors.
4) Validation & Real-Time Feedback:
a. Live preview allows testers to instantly see how steps will play out, enabling quick adjustments and validation.